
Ask Questions, Get Answers
Before Anything Else
What is marketing cloud ?
Marketing Cloud is a set of digital direct marketing solutions that enable businesses to convert as many visitors as possible to customers, communicate directly and continuously with them.
The solutions of marketing cloud includes tools such as pop-ups, email marketing, newsletters, landing pages and more. Some of them are automatically managed by a marketing automation, and the other are managed proactively by marketers.
What software/hardware do I need to use inwise?
Any computer using Microsoft Windows XP or a later version of operation system, and Google Chrome or Firfox 3 or later version browser will do. For image editing you can use a variety of editing software; We personally like IrfanView.
What is Email Marketing?
Email marketing is a powerful marketing tool and a most effective way to connect with customers and strengthen your relationship with them. Email marketing allows you to promote products and services, send updates, invites, or any other information you want your customers to know. Email marketing is anti-spam, consisting of consensual communication with each of your customers.
Why should I use email marketing?
Email marketing allows you to communicate with a large number of customers – both existing and potential, at a relatively low cost. It allows you to convey your message to your customers without requiring them to actively search for your message. It also provides you easy tracking of delivered message, and its recipients’ response to it. One of the most important features enabled using email marketing is the ability to accurately measure your ROI (return of investment). Email marketing is a great way to increase your customer scope, communicate with them, engage them, and be green by marketing and advertising without any use of paper.
Why inwise?
Because whether you are a large-scale corporation, a one-man local business, a non-profit organization, or a personal blogger, inwise will meet all your email marketing needs.
How? By providing 360-degree solution. Use inwise for public relations, newsletters, product launches, quotes, invoices, sale alerts, reminders, greetings, internal communication, memos, reports, photo sharing, and so much more.
How to begin?
First, sign up for free trial account. After completing a brief sign up, you can log in to inwise and import your list of newsletter subscribers. Then you can add your company details (name, logo, etc. ), design a newsletter, create a landing page, and much more.
Need help? Our support will assist you in the channel of your choosing.
Do I need any technical knowledge?
Not at all. inwise is an all-user system, providing you a simple and user-friendly interface. In our support area you will find step by step guides.
Do I need to know HTML code?
Nope. inwise has an intuitive and simple-to-use editor, allowing you to design and edit your newsletter without any hassle. You can change basically everything, using a drag and drop interface: fonts, colors, images, links, and much more.
Do I need to download inwise to my computer?
No. inwise is an online service. That means you can use it via your browser, just like any other website you visit. Entering your username and password will take you inside your inwise account.
My Account
Why do you need to approve my account?
We believe in authorized marketing based on reciprocity between marketer and customer. That is why we allow for such reciprocal communication only.
To guarantee our customers enjoy high deliverability (emails sent are not blocked or labeled as Spam), we make sure everyone under our roof is playing by the rules, distributing proper content to legit contact lists.
Our support team reviews every new inwise account before approving the publishing and sending out newsletter and form features
What can help speed up your account approval process?
- Complete and comprehensive fill-out of your account approval form. This allows us to get to know you and your objectives of using the system better and faster. Every detail you can provide us helps the process.

- Creating an email campaign (newsletter) or designing a landing page with real content.
Uploading your contact list.
We do our best to approve accounts within 1-2 business days.
Feel free to contact us and ask to speed the approval process
Why my account did not approved?
Possible reasons why an account would not be approved may be:
- You are not following inwise terms of use.
- Insufficient detail on the approval request form does not allow us to know you and your objectives of using the system well enough.
- The approval request form was sent multiple times without providing the additional required information.
- The objectives of using inwise system does not meet inwise terms of use.
The content of your email campaign (newsletter) does not meet inwise terms of use. - The origin/source of the contact list is unclear.
- The account uses a temporary email address.
To dispute this decision please contact us
I received a message that said you were missing information about my account. What should I do?
In some cases, after reviewing your inwise account, we need more information about you and your objectives for using the system before approving it for ongoing use.
In these cases, to proceed with the process of approving your account, we ask that you resend your request filling it out with as much detail as possible.
To help speed up the process we recommend creating campaigns or landing pages with real content as well as upload your contact lists to the system.
I forgot my password. What now?
No need to panic. It’s all good. To get your password, you can either:
- Go to Login page, and Click ‘Forgot your password’. This will guide you through resetting your password.
- Contact our support team.
Need to reset the password of someone else in your organization? Users of Manager permission level can do that. After resetting their password, go to the Settings menu and choose Replace Password to set a new one.
Why am I asked to change my password?
We put great effort in protecting your data. As part of our security measures, we ask you to change your password periodically.
Where my account’s Api Key appear?
In the black menu bar, on the left side of the screen, under “Integrations and Developers”, select “Api Key”.
If I accidentally deleted groups/contacts/campaigns/pages/forms, is it possible to restore them?
If you have accidentally deleted groups, contacts, campaigns, pages, or forms, they are kept in the recycling bin for 7 days before being permanently deleted from the system.
Access the “deleted items” from the black menu in the left side of the screen.
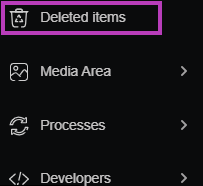
Once you are on the “Recycle bin” page, select the deleted item that you want to restore and click “Restore”.
Where can I see my account billing plan?
Click the “Little Man” icon (account settings) on the top right of the system and click “My Billing Plan”. In that screen you can see in which plan your account and which existing tickets do you have.
Can I freeze my account?
You can freeze accounts on a monthly plan (based on the number of contacts).
Account managers can freeze the account for up to 30 days.
Once the account is frozen, you can still run campaigns, submit for review, view reports, and update your contact lists.
* Limited to two freezes per year.
* During the period when the account is frozen, no charges will be made.
How do you freeze an account?
Enter to your account, click on the little man’s icon at the top right of the screen and select “My Billing Plan”, then click on the “Freeze customer” button.
Can I close my account?
We are sorry to hear that you want to close your inwise account 🙁
To close your account, enter your account, click on the little man’s icon at the top right of the screen, select “My Billing Plan” and click on the “Close customer” button.
I was notified that my account has been closed, why?
Cases where an inwise account is closed and the stored information disappears:
- After the trial period of 30 days from the date of opening the account ends, the account will be closed and all information stored in it will be deleted.
- After a year of no login.
- 30 days after the card expires or is no longer valid.
- If there is a debt for more than 30 days.
- The account manager has decided to close the account.
Once the account is closed, no information, media, or activity history can be recovered from it.
When my account is closed, what happens to the data within it?
Once the account is closed, no information, media, or activity history can be recovered from it. Therefore, we recommend exporting information important to you from your account.
Contacts and Groups
There are 2 options for managing contacts in inwise system:
1. Manage contacts and groups (internal source) – The most popular way for businesses and organizations who choose to manage contact lists in inwise. We recommended to reading
he guide managing and segmenting contacts.
2. Manage contacts and groups (external source) – Organizations that maintain a database (SQL in its various versions) can connect inwise system with their database without to
export and import data between diffrent systems.
How to import contacts?
You can import contacts in one of the following ways:
- Bulk import: upload a CSV/Excel file with your contacts.
- Manually: If you want to import a small amount of contacts, you can add them manually. If you want to enter email addresses only, you can entering all your contact email addressees together, separated by comma. Want to enter additional information on each contact? You can enter them manually one by one in the new contact area.
- Connecting to external database: You can import a contact from an external database using an API connection. This options has advantages and disadvantages: The advantage is allowing you to manage the contacts in groups. The disadvantage is that using this option, some features will be unavailable, including remove from group, duplication and more.
- Import from Outlook: this is the least recommended option due to security limitations posing difficulties on the import process. In this case, we recommend exporting your contacts to a CSV/Excel file, and importing it to the system, as described in option 1 above.
Can I add contacts to more than one group?
Definitely. You can choose in the contact person area all the groups you wish to add the specific contact to. Sending a newsletter to more than one group, contacts included in more than one of these groups – will receive the newsletter one time only, as the system eliminates duplicate delivery automatically. This last feature does not apply when using external groups/contacts.
If the contact appears in more than one group, will he receive the mailing more than once?
No. An email campaign will be sent to each contact only once, even if contact appears in different groups and for each group the mailing is sent separately.
How to edit a contact’s details (email/phone number/name)?
Type the contact’s details (name or email address) in the search field. After you’ve located him, edit his personal details.
If you’ve encountered an incorrect email address in a statistic report, you can go directly from the report to the contact area for editing by clicking the ‘edit’ button.
When I adding a new contact to a group, the system reports that he is already exist. why?
In this case, there’s a good chance this contact already exists in another group. Try locating the contact using the search field (at the top part of the screen). Found him? Great. Now add him to the relevent group. If you have a large number of contacts you wish to add to a new group, consider importing them via a CSV/Excel file.
I do not see all of the contact details in the group page. Why?
On the group page, only the default fields appear to prevent a table full of details.
You can customize the table by clicking the the “Display fields and search” button, select the field you want to add to the table in the “Available fields” pane and click the < to move it to the "Display fields and search" panel
[/av_toggle]
[av_toggle title='How to define a multiple select field for contacts?' tags='' av_uid='av-43vh25r' custom_id='' sc_version='1.0']
Only Field # 20 (from fields setting screen) is defined as a multiple selection field.
To defined that field, click on the little man icon in the upper right menu and select "Fields Setting".
- Add textual field
- Field number - update to 20
- Title - enter the field name
- Field type - select closed field
- Multiple select - mark v in the checkbox
- In the textbox - update the segmentation details.
During import excel file, assigned a column for fields number 20. In this column, update the segmentation details for each contact.
Notice - the details must start with a comma (",") and end with a comma (",").
For example: ,students,teachers,parents,
[/av_toggle]
[av_toggle title='I imported an Excel file that contained contact information, but only some of the details were updated, why?' tags='' av_uid='av-4319b7j' custom_id='' sc_version='1.0']
It is reasonable to assume that the contacts whose details were not updated are contacts that already existed in the system and that a quick import was made. The purpose of the quick import is to import new contacts (including their details) into the system, or add existing contacts to a new list (without updating details). To update the existing contact information you should import the file in slow import.
I imported contacts, but updated were less than the original number, Why?
There are several possible reasons:
- The file consisted of duplicated contacts, meaning – more than one contact under the same email address.
- Some of the contacts have an incorrect email address.
- In case of slow import, the system checks 2 key fields: email and phone. There may be conflicts between these fields.
Conflict resolution is accomplished by logging into the import archive and viewing the relevant import report. Clicking the “conflicts” button will resolve the conflict and update the number of contacts for the group.
I imported a CSV file, but some of the fields were not updated, Why?
There may be two reasons for this:
1. The field is not mapped during import.
2. A file may have a field that does not exist in the system. In this case, a new field system must be created.
More information can be found in the guide – Contacts information fields.
When I imported a CSV file, I get the following message: "The given value of type String from the data source cannot be converted to type bigint of the specified target column", Why?
Typically, the message above is received as a result of field mismatch, for example – entering letters or characters that are not numbers in a number field (i.e. a phone number set as a number field). What you do is re-import the contact file, and map the fields from the file in accordance with the fields in the system.
Why can’t I import a contact file in Excel format?
Please try the following solutions:
- Make sure the file name ends with .csv. If not, edit the file name / file format accordingly.
- Check if there is an illegal character or sign in one of the columns.
- If the file is above 10MB, split it into two separate files.
How to remove contacts from one group to other
If you need to transfer several contacts or the entire group:
1. Move to group – log in to the contact group, check the relevant contacts and click on the “Move Group” icon ![]() .
.
Note that this will delete the contacts from the original group and transfer them to the new group.
2. Copy to group – Click on the “Copy to Group” icon ![]() .
.
This action will not delete the contacts from the original group.
How to remove a contact from one group without deleting him from the other groups?
When editing the contact card, remove the ✓ from the checkbox for the group which you want to remove the contact.
How to delete an external group that’s not connected anymore?
Press the “Delete” button next to the external group.
How to export contacts list?
In the main menu bar on the left, click on the “Contacts” tab and then click the “Total Contacts” circle – the list of all contacts in the account will be displayed.
Click on the “Export” icon located at the top right of the screen ![]() .
.
You can also export the rest of the lists in the same way: Unsubscribe contacts, Contacts with invalid mail or phone. Bounced more than 2 times.
Unsubscribe
Does the system have an unsubscribe mechanism?
Yes, absolutely.
According to the anti-spam law, every email of marketing nature must include an unsubscribe link allowing the recipient to remove himself/herself from the mailing list and not receive any more emails from the sender. That is why inwise automatically attached an unsubscribe link to every email and campaign you send.
What about Unsubscribe link?
An Unsubscribe link is added automatically to every newsletter. You can view it at the bottom part of your newsletter. This option is important both marketing wise, to allow your recipients the option to choose the messages they wish to receive, as well as legally, as part of the anti-span law, requiring all sender of advertising messages to include this option. Your recipients choosing to unsubscribed are documented and classified as such in the system.
How can I return unsubscribe contact to the mailing list?
If a contact has removed himself from the mailing list, the law prohibits mailing to him.
It must be followed up with a written request for his approval before returning him to the mailing list.
In order to accomplish this, enter the contact’s email in the search field (the magnifying glass in the top-right menu).
Entering the contact record (card) and click on “Send an email requesting a return to the mailing list” (if this line does not appear, contact our support team).
The contact will receive an email requesting confirmation of his return to the mailing list.
How can I add a contact to the white list, so that they cannot be removed from the distribution list?
This option is primarily intended for adding inwise system users to prevent them from being unsubscribe from the distribution list.
In the “Unsubscribed contacts from Emails” screen, click on the “White listed recipients” button.
After adding the contact’s details, an email/SMS will be sent to them for confirmation of their addition to the authorized list.
Once confirmed, they cannot be removed from the distribution list.
Can I update the text that appears on the unsubscribe link?
Yes, you can change the text of the unsubscribe tag in the account settings by adding # unsubscribe # tag as a link in the text.
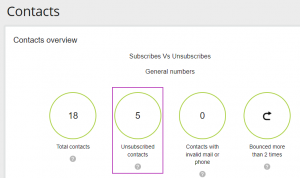
Where can I see the unsubscribe list?
On the Contacts page, click on the green circle “Unsubscribed contacts”.
You can export the list, by clicking on the export icon at the top right of the screen ![]() .
.
How to unsubscribe contact?
- At the “Contact” screen’ click on the green circle “Unsubscribed contacts”.
You can add the contact’s address or import CSV files. - In addition, the contact can cancel the registration himself by clicking on the “Unsubscribe” link in the email or SMS he received
I imported unsubscribed contacts, but they are not updated in the system. Why?
Importing unsubscribed contacts, there are clear rules regarding the Excel file format. The Email column should be the first column, and the column header must be – Email – in English only. Also, the first line must be a title row.
What are the reasons for removal from a contact list?
There are three main types of removal from the contact list:
“Manuallay” – The sender removed a contact by adding his email address to an unsubscribe list.
Import – Import an unsubscribe list
Self – If the contact has chosen to remove himself, he must choose the reason for this:
1. These emails are not relevant to me
2. I do not want to receive any more emails
3. I do not remember ever signing up for this list
4. I get too many emails
5. The emails are spam
6. Other
If the contact has reported via the email service about the mailing as “spam” (in Gmail for example) – you will register for reason # 8
Do I need to delete a contact who unsubscribed when importing a contact file?
No need. Contacts who unsubscribed from a group can be part of the standard mailing list, but they will not receive newsletters as part of the unsubscribed contact list.
Edit an Email Campaign
What kind of images can be uploaded to the system?
When you save images use PNG, JPG or GIF format.
Maximum file size: 1.5 MB for an image.
Please note – the size of the picture affects the amount of time it will take to download it to the computer or the phone
How to remove/add social networking icons
During editing the campaign, click on the “Add Element” (Plus Icon ), drag the “Follow us” element .
Clicking on the icons will open a content design pane. Click on the “Edit Icons and order” button.
Clicking on an icon of each social network and its darkness – will remove it. Clicking on and lightning the icon will activate it.
Entered in the field of each icon the relevant address
Can I copy content from files like: Word, Excel or Web site to the content editor?
This is not recommended.
When you copy exists content from other files such as Word, Excel, Web site or similar software, other code lines are added.
Therefore, we recommend copying the content to a simple text editor such as Notepad, and then copying the content to the system.
How to create a new template from an existing email campaign?
At first, you have to create a new email campaign. Once you’ve updated your mailing information, you can select the “Copy this message” option.
Next, select the campaign you want to copy, and click the “Copy” button. A content editor screen opens, where you can edit, adjust, and resubmit your mailing.
Can I edit an email campaign that I already sent?
You can not edit an email campaign that has already been sent, but it can be copied, edited, and resubmitted.
First, create a new email campaign. Once you’ve updated your campaign information, select the “Copy this message” option
Then, select the campaign you want to duplicate and click the “Copy” button. A content editor screen opens, where you can edit, adjust and resubmit your mailing.
Alternatively, from the list of campaigns, select the campaign you want to duplicate and click “Copy”.
Can I add a form to an email campaign?
It is not possible to integrate forms within the mailing because the various mail companies (Gmail, Outlook, etc.) block them, for security reasons.
You can attach a link to a landing page that has a form to the mailing.
Is there a maximum email length limit? How can I extend it?
In terms of the system – there is no maximum length limit to the mailing.
Mailing can be extended in the following ways:
- Duplicate a component that appears in the mailing – click on the component you want to duplicate and click on the duplication icon
 .
.
- Add components – By drag&drop components to the campaign template.
How to add a link to a Word/Pdf file?
You can upload to the media area different types of files such as: PDF, HTML, WORD, XLS, ICS, iCalendar format and more.
You can find information about this in the Media area guide
How to add a link to a clicker email address?
When editing the email campaign, stand on the text block/image/button element, where you want to add the link and click on the small pencil icon “Edit Element” .
To make an image into a link -in the pane that opens click on “Edit link”
In the “Link type” field and choose “E-mail”
To make a text or a button into a link – in the pane that opens click on the icon “Link” ![]()
In the “Link type” field and choose “E-mail”
In the “Email address” field, entre the email address at which you would like to receive the referral.
In the “Email subject” field, you can define the message subject you receive. For example: “Email from Winter campaign.”
How to add a link to a clicker phone number?
When editing the email campaign, stand on the text block/image/button element, where you want to add the link and click on the small pencil icon “Edit Element” .
To make an image into a link -in the pane that opens click on “Edit link”
In the “Link type” field and choose “Phone”
To make a text or a button into a link – in the pane that opens click on the icon “Link” ![]()
In the “Link type” field and choose “Phone”
In the “Mobile number” fields, entre the phone number.
How to add a link to a clicker WhatsApp number?
When editing the email campaign, stand on the text block/image/button element, where you want to add the link and click on the small pencil icon “Edit Element” .
To make an image into a link -in the pane that opens click on “Edit link”
In the “Link type” field and choose “WhatsApp”
To make a text or a button into a link – in the pane that opens click on the icon “Link” ![]()
In the “Link type” field and choose “Phone”
In the “WhatsApp” fields, entre the phone number.
How to link a landing page in an email campaign?
When editing the email campaign, stand on the text block/image/button element, where you want to add the link and click on the small pencil icon “Edit Element” .
To make an image into a link -in the pane that opens click on “Edit link”
In the “link type” field and choose “Landing Page” and select the relevant landing page.
To make a text or a button into a link – in the pane that opens click on the icon “Link”
In the “link type” field and choose “Landing Page” and select the relevant landing page.
How to create a link to an anchor?
While editing the campaign, mark the text that will serve as an anchor, in the toolbar click on the Anchor icon ![]() .
.
In the anchor properties pane type the name for the anchor.
To create the link to the anchor:
- To link a text or a button to the anchor: Mark the text, in the toolbar click on the link icon
 .
.
In the “Link Type” drop-down menu choose: “Link to anchor in the text” and choose the anchor name, this item should link to. - To link an image to the anchor: in the pane that opens click on “Edit link” and choose the anchor name (for example: # Workshop details).
How to add a botton to unsubscribe?
While editing the email campaign, add a button element to your template and click on it.
In the pane that opens, type in the “Title” field, the text that you want to appear on the button.
(for example: To remove from the mailing list, click here).
Then click on the icon “Link” ![]()
In the “Link’s URL” field select “Other” (instead of https://) and type #unsubscribe#
How to create a "Send a Friend" link within an email campaign?
While editing an email campaign, click on the text block where you want to add the tag, and then click on the small pencil icon next to it “Edit Element”.
Click “Custom Tags” and select the “Send To Friend” tag. This tag can be tracked, so you can know to which other recipients the mailing has been sent
How to add the contacts first name in the Contacts bar ("To")?
Yes of course. There is a comprehensive guide that explains how to do this – for viewing the guide
How can I update the Email preview text?
When you finish to editing and designing your email campaign, on the “”Campaign settings” screen
You can update the text on the field “preview text” the text which you want to appears next to or below your email subject line on your recipient’s inbox.
In the field “preview text”, you can edit the text that appears near the subject line of your email, on your contacts inbox.
Why the contact received a mailing containing the text "click here" in addition to the link itself?
The email display setting in the contact mailbox may be in a text rather than HTML.
How to copy text formatting that appears in another text block of the campaign email?
You can duplicate the text block where the formatted text appears (clicking on the Duplicate Element icon), and update the relevant text.
How to import fonts into the system or use different fonts?
Only fonts built into the system can be used because they are recognized and supported by all mail servers.
I created a new email campaign and when I try to send it to a test group I get a message, that the link is too long, what should I do?
There is a certain limit on the length of the links. If you receive such a message, you can contact our support.
I am trying to create a link in an email campaign and receive an error message. What causes this?
The cause of that problem is an object that was copied incorrectly from Word, as soon as the object will be deleted – the problem will be solved. Therefore, try removing different elements from the mailer (one at a time) and try to create a link again.
How long does the system maintain an automatic backup of an email campaign?
The system keeps backups for only a few days. You can use this option to recover email campaigns.
How to restore an earlier version of the campaign before the change was made?
On the Edit Campaign screen, in the top menu bar, click the “Save” button and select “Saved versions”
The list of recent saved versions will open. Clicking on each version will display it. To restore one of the versions, select “Restore this version”.
How can I change the sender’s name and the "replay to" address of an email campaign?
Guide – sending profile
Guide – Setting “reply to” email address
Sending an Email Campaign
How to check my billing plan?
Click on the “Little Man” icon (account settings) in the upper right of the system, then click on “My billing Plan”.
How to schedule an email campaign sending?
Once you finished editing your mailing, on the last screen, you can select “choose a date” and schedule the sending time.
Is it possible to track contact’s actions?
Yes, while you enter to the contact card, click on the “View History” icon located in the top menu bar. This screen shows all the relevant statistics for the contact.
Is there a mechanism that prevents a campaign from sending multiple times to the same contact?
The system has a mechanism that prevents duplicate email campaign sending to the same contact. This mechanism refers to the contact’s e-mail address. However, if you send a duplicate campaign, it will be sent again to the same contact. That’s because the number of the copied campaign is different from the original mailing.
Is it possible to resend a campaign email that has already been sent to a new contact?
Yes, after adding the new contact to the contact group, resubmitted the campaign to the same group. The campaign will be sent only to the new contact.
You can also create a new contact group and resend the campaign to that group.
I sent an email campaign to a contact list, but in fact, it was only sent to some of them, why?
There may be several reasons for this:
– The contact list included contacts who removed themselves (unsubscribe)
– Incorrect email addresses
– Bounced contacts from previous campaigns.
You can look at the funnel in the analytics area to understand the distribution of those contacts that did not receive the campaign.
How can I change the sender’s name and the "replay to" address of an email campaign?
Guide – sending profile
Guide – Setting “reply to” email address
What is the difference between Hard Bounces vs. Soft Bounces ?
A hard bounce is an email that couldn’t be delivered for permanent reasons. Maybe the email’s a fake address, maybe the email domain isn’t a real domain, or maybe the email recipient’s server won’t accept emails
A soft bounce is an email that couldn’t be delivered because of temporary reasons. An inbox may be full or the email file might be too large, among other reasons. inwise will keep trying to deliver the email for a while, If the message continues to be reject continuously the system will return it.
Is it possible to set that contacts whose mails returns regularly to be automatically deleted from the contact list?
These contacts cannot be automatically deleted. In each mailing, the system checks whether a particular contact has returned X times in the past Y days. The default is that a contact who returns 3 times within two months will not be sent a fourth time.
If necessary, you can change the time setting.
According to the contact, he did not remove himself from the contact list, but in the system, he appears in the unsubscribe list. how?
The contact may have forwarded the email to other contacts, who are not in the contact list. If one of them accidentally clicked “Unsubscribe”,” the “original” contact will be removed from the contact list.
In this case, you should contact our support.
The contact has opened the email, but there is no indication in the system, why?
There are organizations that have information security systems that scan the email content before arriving in the inbox, sometimes performing “open”, “click”. Therefore, you get an indication of actions that aren’t actually done.
what can you do? First, it is important to understand that this phenomenon is usually marginal (unless you are primarily mailing to organizations with security systems that scan inbox).
If necessary, you can contact our support to include IP addresses in a filter list – so we will ignore the actions of these systems.
* It is important to note that not all of these systems have fixed IP addresses.
Why images and background images do not appear in the Outlook program?
Blocking images is the default setting of the Outlook program, changing the setting is performed on the contact’s computer.
They can unblocked this as follows:
Enter the relevant mailer, right-click on the mouse and select “Add sender to safe senders list” or select “Add @domain to the safe list” .
Email Campaign Statistics
How to observe email campaign statistics?
In the main menu bar on the left, click on the “Analytics” tab and then click.
You can observe the statistics for all the campaigns sent. You can also select a specific campaign and watch its performance individually
Is it possible that a contact clicked on the same link several times?
I sent an email without tracking clicks, is there still a way to know who clicked on a link?
There is no way to see after sending (without tracking clicks) who clicked the link. Because the system sends the links as they are without coding.
How to send campaign again to contacts that didn’t open?
If you didn’t set “send to didn’t” on the “Schedule and approve campaign sending” screen, while sent your campaign.
On the campaign statistics screen, click on the “didn’t open” in the performance funnel.
Click “Add contacts” and select “New group”.

Duplicate the relevant campaign and send it to the new group you created.
In the mailing report, what does "distribution of return mailings" mean?
There are all the contacts who returned the mailing or who it wasn’t sent to. There are several reasons for this:
- There mailing box is full
- Wrong Domain
- Wrong Email address
- The contact unsubscribe
The exact reason for each segment of the performance funnel is visible in the analytics area.
WhatsApp Campaign
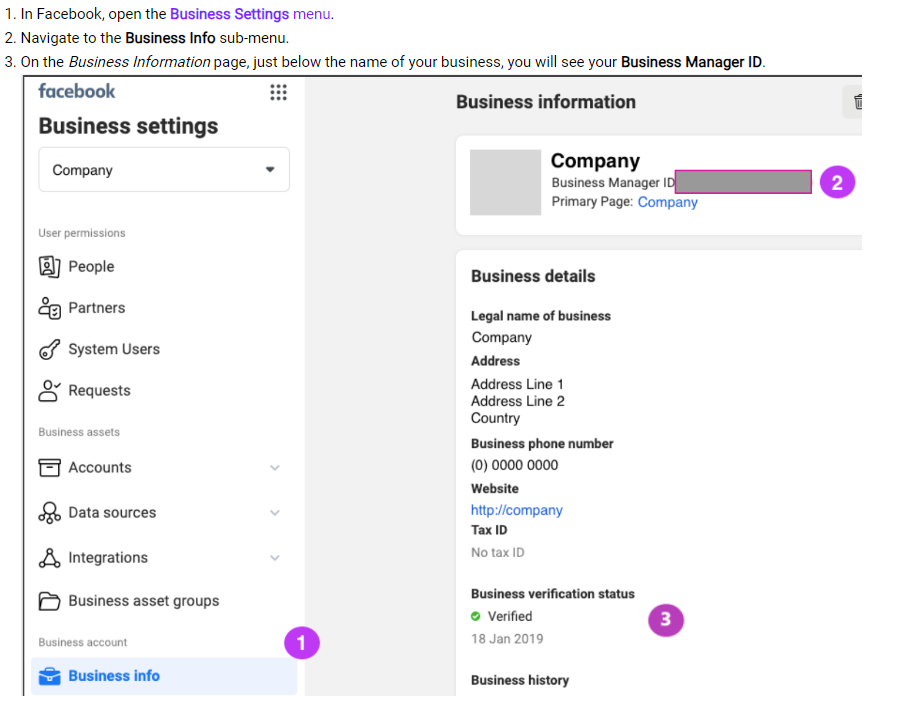
How to check if the Facebook Business Manager account has been approved and what is its ID number?
- Navigate to your Facebook Business Manager Settings page.
- On the Business Info tab, look under Business Verification Status.
- The business manager’s ID number appears at the top of the screen next to the company’s logo.
- If the verification is complete, it will display Verified with a green tick, and the date of verification.
Which kind of messages can be sent via WhatsApp?
There are 4 business-initiated conversation categories:
1. Utility conversations (operational) – Facilitate a specific, agreed-upon request or transaction or update to a customer about an ongoing transaction, including post-purchase notifications and recurring billing statements
2. Authentication conversations – Enable businesses to authenticate users with one-time passcodes, potentially at multiple steps in the login process (e.g., account verification, account recovery, integrity challenges)
3. Marketing conversations – Include promotions or offers, informational updates, or invitations for customers to respond / take action.
4. Service conversations – all user-initiated conversations will be categorized as service conversations, which help customers resolve enquiries.
Is it possible to send marketing messages via WhatsApp?
Yes. WhatsApp recently added the option of sending marketing messages – as long as you comply with WhatsApp’s rule of use and avoid posting inappropriate content (cannabis products, fake products, cigarettes, alcohol, etc.) and illegal content (trafficking organs, software, drugs, weapons, etc.).
Before sending the message, the content of the message (template) must be approved by WhatsApp.
What’s the advantage over WhatsApp Business?
The advantage of sending messages using inwise:
- Sending personal messages – incorporating personal details in the message (name, date of birth, scheduled appointment time, shipping number, etc.)
- Sending messages to contact lists from an Excel file, CSV, or through integration to organizational systems
- Monitoring the timing and rate of sending messages
- Interfacing using RestAPI
- Detailed analytics: how many contacts the message was sent to, who received the message, who opened it, and who clicked on the link
- Preview the message before sending it
- Accessing from several computers (and not just from one cell phone)
- Multiple representatives can provide a response at the same time
- Documenting correspondences
- Integrating WhatsApp messages into customer journeys
How to start?
In order to open an official WhatsApp Messenger account, their is official process must go through.
Before you start you need:
- A Facebook Business Manager account
- A verified business
- To purchase an inwise mailing package
- A virtual phone number
inwise assists throughout the process.
From which number will the WhatsApp messages be sent?
- It is possible to purchase a virtual number through inwise, from which messages will be sent.
- You can use a mobile phone number and/or landlines that you already have, as long as it meets the following conditions:
- It is not associated with any personal or business WhatsApp account.
- SMS messages or calls can be received on this number, even from a U.S. number with the prefix 1+ (for verification code purposes).
- It is not associated with a call center.
Why does the content of the template (message) need to be approved by WhatsApp?
WhatsApp wishes to protect its users and therefore any content sent by marketers requires its approval.
Each template is sent for approval.
The text of the approved message can be templated and contain parameters (personal fields) that may vary from one message to the next.
Is there a limit to the number of characters per message?
WhatsApp recommends sending messages that contain up to one thousand characters.
How to send a template for approval?
You can send the content of the message for which you wish to receive approval to our support team who will handle the approval of your message by WhatsApp. It takes up to 24 hours to get the approval. WhatsApp may require a change in the content of the message.
I created a WhatsApp template and found a mistake. I edited it, but it still hasn’t been approved. Why?
After editing an approved WhatsApp template and submitting it for Meta’s approval, the approval process may take anywhere from a few minutes to 24 hours, depending on the type of review Meta conducts.
Templates that include images or links may take longer to review.
Quick solution: It is recommended to create a new template and submit it for approval.
You can also duplicate the template, edit it, and submit a new version instead of waiting for the edited version to be approved.
*This can be easily done in the Templates section.
How many messages can be sent?
WhatsApp limits the number of contacts to whom messages can be sent each day (every 24 hours) according to the account rating, however it does not limit the number of messages that can be sent to each contact.
WhatsApp rates each account according to four levels of sending:
Tier 1 – Sending to up to 1,000 contacts per day (each new account)
Tier 2 – Sending to up to 10,000 contacts per day
Tier 3 – Sending to up to 100,000 contacts per day
Tier 4 – Sending an unlimited number of messages.
Each new account starts from the first level (Tier 1) and moves up to the next level automatically as the number of messages it sends increases and its positive reputation is maintained.
*This limitation does not exist in case the contact person starts the conversation.
How do you switch from one sending level to the next?
Switching between the first tier and the second tier is made automatically after sending 1,000 messages within up to one week.
For example: if you send 700 messages on the first day and 300 messages to other contacts on the second day, on the third day you will automatically move up to the second tier (allowing you to send up to 10,000 messages per day).
Switching between the second and third tier is made automatically when you send 20,000 messages within up to one week.
Switching from the third to the fourth tier is made automatically when you send 100,000 messages within up to one week.
inwise has no control or influence over the rating results or the reputation of the sender.
What happens if I exceed my sending level?
In case of exceeding the number of messages, WhatsApp will block the exceeding messages.
It is highly recommended to adhere to the daily sending limits, as there is also a charge for sending extra messages.
What factors can prevent moving to the next level of sending?
WhatsApp also rates the quality of messages sent from each account.
Messages that have been classified as ‘spam’ or have been blocked by the clients, will damage the reputation of the sender and prevent them from switching from one sending level to the next.
How is the number of sent messages calculated?
There are 4 business-initiated conversation categories:
1. Utility conversations (operational) – Facilitate a specific, agreed-upon request or transaction or update to a customer about an ongoing transaction, including post-purchase notifications and recurring billing statements
2. Authentication conversations – Enable businesses to authenticate users with one-time passcodes, potentially at multiple steps in the login process (e.g., account verification, account recovery, integrity challenges)
3. Marketing conversations – Include promotions or offers, informational updates, or invitations for customers to respond / take action.
4. Service conversations – all user-initiated conversations will be categorized as service conversations, which help customers resolve enquiries.
WhatsApp counts by the number of individual contacts to whom the messages are sent.
Conversation charges will be based on template category. When a template is delivered, it opens a new conversation of that category for 24 hours and incurs the charge of that conversation category, unless the template is delivered during an open conversation of that category. For example, if a utility conversation is open and a marketing template is delivered within that open conversation, a new, separate marketing conversation is opened and marketing conversation charge is initiated.
However, sending multiple templates of the same category within an open conversation will not incur additional charges. For example, a business can send multiple utility templates in an open utility conversation with no additional charges.
How can the contact list be imported into the system?
The contact list can be imported into your inwise account using a CSV file, copy/paste from Excel, or from external databases.
Is it possible to send messages with personal information to the contacts (with first name, date of birth, etc.)?
Yes, you can integrate personal fields in messages, information you have collected about your contacts and that have been updated in the inwise system.
The wording of the message sent to WhatsApp for approval can be templated and contain parameters that will change from one message to the next.
How to do it –the Guide.
Can a contact unsubscribe from receiving WhatsApp messages?
Anyone can unsubscribe from receiving messages from you.
Note that this action damages your reputation on WhatsApp.
Can WhatsApp block my business WhatsApp account?
Yes. WhatsApp protects its users from inappropriate content and spam.
That is why it is important to make sure to send the right message to the right contact. Be sure to send interesting and relevant content that they will want to continue getting from you.
Can WhatsApp be used in a customer journey?
Of course! It is even recommended to integrate WhatsApp messages as part of the customer journey.
Is it possible to view the statistical reports of a sent WhatsApp campaign?
Of course! When entering the list of campaigns, clicking on the Analytics button next to the relevant campaign will show you the sending data, both at a general level (how many were opened/clicked) and at an individual level who opened the message and who clicked on the link.
Is it possible to view incoming WhatsApp messages from contacts?
You can view the correspondence with the contacts on the “conversations” screen.
Is a history of conversation with the contacts saved?
Of course! The conversation with the contacts can be seen at any given time on the “conversations” screen.
Can several representatives answer at the same time?
Yes, multiple representatives can send messages and view the responses at the same time.
Is it possible to connect from different computers?
Yes. Any inwise system user can log in from any computer at any time using a username and password.
I sent a WhatsApp message, but it wasn’t delivered. Why?
There are several possible reasons:
- Daily message limit: The recipient may have reached the daily limit for marketing messages from businesses.
To prevent spam, Meta restricts the number of marketing messages a user can receive per day. - Lack of interaction with previous messages: If the recipient has received messages from you before but hasn’t responded, Meta may assume they are not interested and block further messages.
- Recipient has blocked messages from you.
- The phone number is classified as kosher and cannot receive WhatsApp messages.
- WhatsApp is not installed on the phone number.
Possible solution: If the recipient responds to your message (even by clicking a button), the system recognizes their interest, allowing future messages to be delivered.
Landing page, Popup & Signup form
Is it possible to post a landing page on an existing domain?
Sure, you can publish a landing page with a reference to your domain with a CNAME record.
While creating the landing page, on the “Settings and Advertising” screen, in the “Advertising settings” field, select “As Your Website URL (CNAME)”.
Update the subdomain, for example: pages.yourdomain.co.il.
Then, ask the responsible entity for the domain, to set a CNAME record turning the sub-domain you set up earlier to:
for-cname-no-proxy.inwise.net.
The subdomain can be used for multiple landing pages.
I don’t have a domain, what to enter in the advertising settings field?
If you do not have a domain, you can publish your landing page on inwise servers. The domain that inwise provides: inwise.net.
You must add the subdomain – any name and provided it is in English letters without any spaces or special characters.
Please note, this domain is uniform and unchangeable for all future landing pages you create.
Where can I place a tracking code on a landing page?
While designing the landing page, on the “Settings and publish” screen, click “+More Settings”, select “+Tracking Code”.
Paste the tracking code to the panel “Other Codes”.
Is it possible to create or add a field that automatically captures UTM values from the landing page URL?
Yes. You can create a text field in the form that automatically captures the value of a UTM parameter from the landing page URL.
To do this, add a text field and set the desired parameter name (e.g., utm_source, utm_campaign, etc.).
Each UTM parameter you wish to capture requires a separate text field.
Make sure to mark the field as invisible, so it won’t be visible to users filling out the form.

Can I get an update email after a sign up form filling out?
Sure. In the Settings and publish screen, check the box “Send Email to the account manager regarding new registration”.
So that the account manager receives an email on each filled out form. The update email will be sent to the email address defined as Account Manager.
You can update the email address on the final screen, after the published, by clicking on “Edit Automation”.
How can I limit the number of registrants through a landing page?
While editing the landing page, in the Settings and publish screen -> under more settings -> Mark V in the checkbox: “Registered number limitation”
You can set the maximum number of registrants and the text that will be shown in case the limitation will be activated.
I created a landing page with a signup form to register for an event. If the places run out, what should I do to prevent further registering
- You can pause the landing page – but whoever enters the link will see that the link is not available.
- It ‘s recommended to limit the number of registrants While editing the landing page. You can define the text that will appear when the places run out.
Is it possible to edit a landing page that has already published?
Yes.
- On the Pages & forms list, click the “Edit” link next to the page/form you wish to edit.
It’s important to complete the update process so that the changes you’ve made show up on the published page or form - You can also “Pause” the landing page and then edit it. Note that while editing, the landing page link is inactive.
How can I know which landing pages are active? and where they published?
In order to know which landing pages are active, navigate to the “Pages and Forms” screen.
In the left side of the screen, filter by status: “Published”
Select Type: “Landing page”.
In order to publish the landing page – you have to copy its link and publish wherever you choose, therefore it is not possible to know through the inwise system where it was published.
How to export signup form’s details?
Navigate to “Pages and forms” screen.
Click on the “Statistics” button, next to the landing page/popup/registration form, whose details you want to export.
Click the export icon in the upper left corner of the screen![]()
Privacy Policy ,Information Security and Spam
What is the Anti-Spam policy at inwise ?
In inwise, there is zero tolerance for spam. With the inwise system, you will have the ability to send a clear and efficient message, and above all – a legal one. You can read more about inwise’s anti-spam policy and the terms of use for the inwise system.
For information regarding the American law against spam: The American anti-spam law – CAN SPAM.
Information for internet service providers and IT administrators:
If you have received a complaint about the distribution of non-legitimate email through our servers, please contact us immediately so we can investigate this.
Information for contacts who have received non-legitimate email from one of our clients:
If you have received an email from a source you didn’t request or if you are unable to remove your details from a mailing list, please contact us immediately so we can investigate this.
What is GDPR regulation?
The purpose of GDRP regulation (General Data Protection Regulation) is to ensure that the individual’s personal information is protected in accordance with the modern technological innovation, regardless of where it is stored or processed. More information -in that guide – Link
How to make sure emails going into the inbox?
We’ve written a guide on how to increase the chances of your next emails going into inbox
How to remove the word "advertisement" from the subject line?
We’ve written a guide on that.