
Knowledge Base > Pages and forms > Create and design landing pages
With inwise you can create your landing page with the Drag & Drop editor while using a variety of free, formatted templates.
Steps for creation & analysis landing Pages :
- Design a landing page
- Design a thank you page
- Settings & Publication
- Analytics
1. Design a landing page
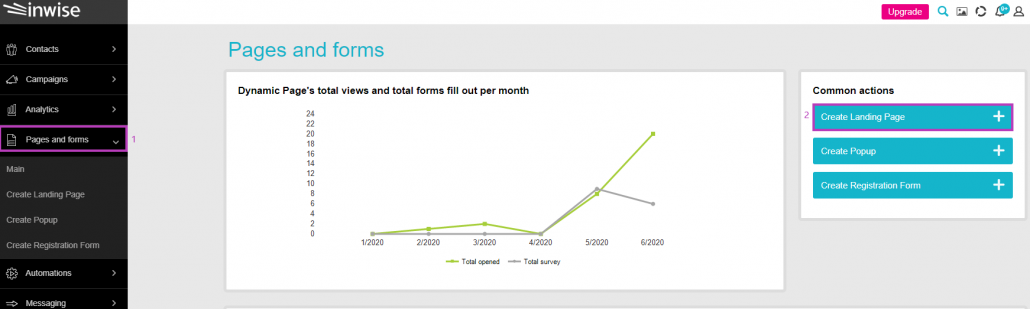
On the main login screen, click on the “Pages and forms” tab in the main menu bar on the left (1). Next, on the “Common Actions” menu, click on the ”Create Landing Page” button (2).
You can also select “Create Landing Page” directly from the main menu bar.
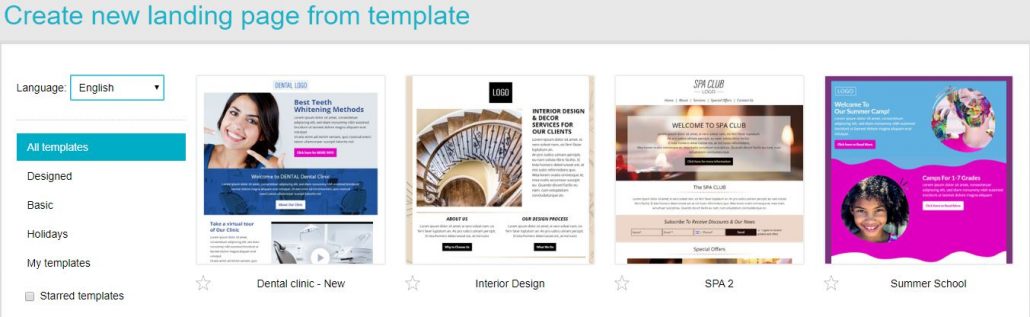
Choose your preferred template.
You can choose a designed template from inwise’s selection, or design a new landing page from a basic template
After selecting the template, the landing page editor will open. Here you can edit and format the content, embed images and design the landing page.
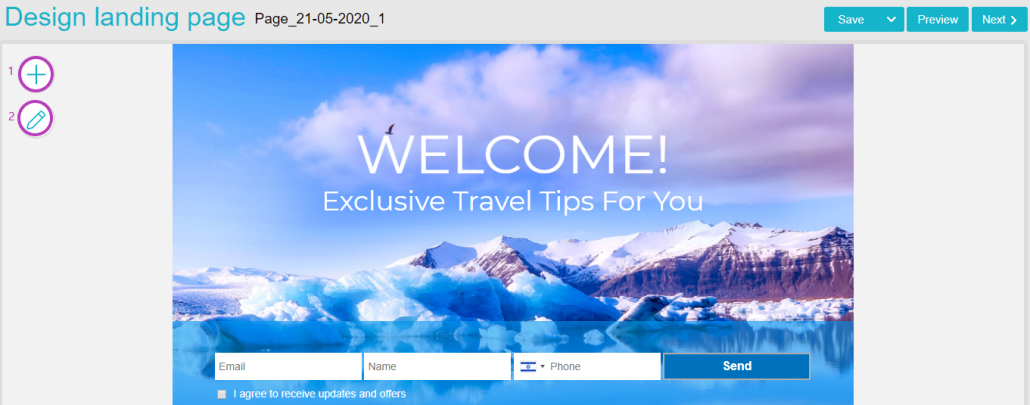
“Edit page” menu:
Clicking on the pencil icon (2) will open the menu “edit page”, where you can influence the entire design landing page:
- Change the outer background color, set the color and the opacity and select a background image from the media area.
- Change the inner background color, set the color and opacity and select a background image from the media area.
- Set the width of the landing page up to 1,300 pixels.
- Border – Define the color, thickness and style of the border.

Add elements :
Clicking on the “+” icon (1) will open the menu “adding elements”. You can add elements to each landing page by dragging and dropping to the relevant area in the template.
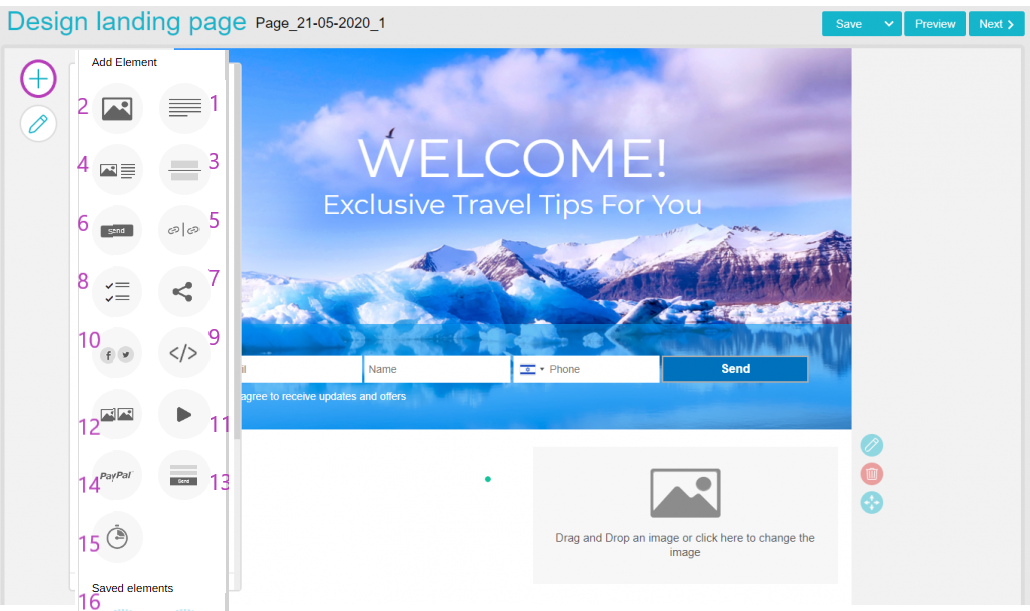
- Text – For adding, editing and designing text. Clicking on the text will open the formatting menu for modification of the font, size, color, and so on.
Tip: Use simple & understandable content. - Image – You can add an image from the media area in your account or upload a file from your desktop. Every image you upload is saved in the media area.
You can edit images with the photo editor on the platform. You can find more information on this in the Media Area Guide. - Breakline – Use to create visual separation.
- Article – You can display a modular component of text alongside an image. This is ideal when previewing an article with an embedded button link prompting the recipient to continue reading. You can switch between the text and the image sides – after dragging the element to the relevant position in the template, click the “Edit element” pencil icon (1), “Block Design” (2) and “change sides” (3). You can also define the proportion of the text to the image (4).

- Links – You can add links to products, services, etc. Just copy and paste the URL addresses.
- Button – You can add a button with a link to a Website for purchasing or registration. Buttons play an important role in your signup form, as they drive the action for which you created the signup form in the first place.
To format the button click on it (1). In the pane that opens you can change the button title (2), font and size. To update the link address to which the button leads, click on the link icon (3) and update the destination address in the panel that opens. You can select whether it will lead to URL or to another landing page on inwise (4).
Also, you can select the button size by padding: length (5), width (6), radius – how rounded or sharp the corners will be (11) and its alignment (12).
Add a frame (8) by setting the line width (9) and the line style (10).
Tip: Ensure the button is noticeable with a contrasting color. Make sure it will look different from the rest of the content (for example, you can design it like a pushbutton).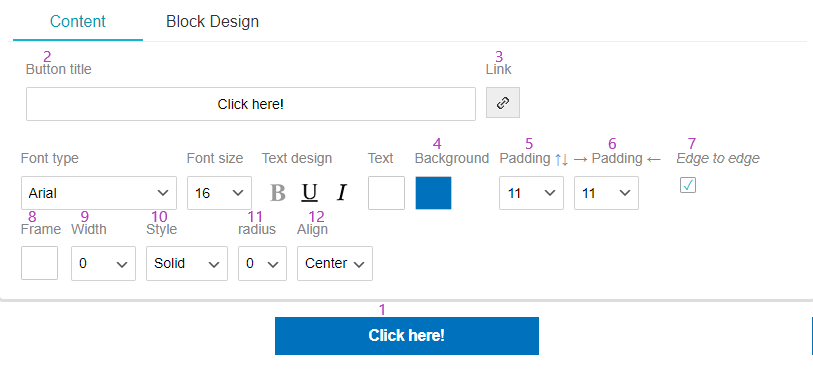
- “Follow Us” – You can add links to your business page or profile on different social media.
To edit the icons click on the little pencil icon in the right corner (1). Select the designs for the icon buttons by clicking on the “Icon Theme” (2).
Clicking on each social icon and turning it dark will remove it. Clicking on the icon again to illuminate it will reactivate. Copy and paste the URL address of each icon in its field. You can also change the order of the social networking icons by dragging them up or down.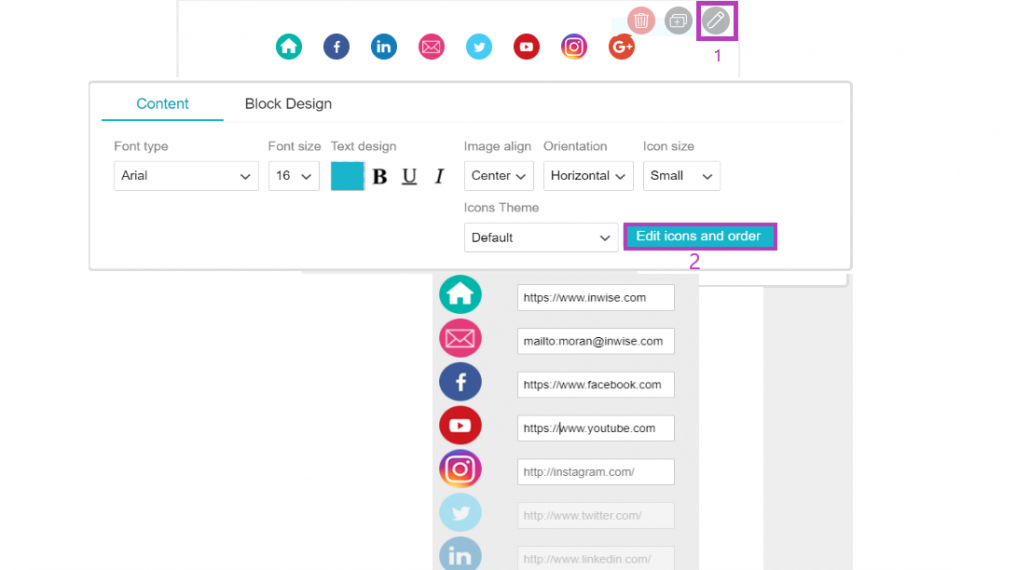
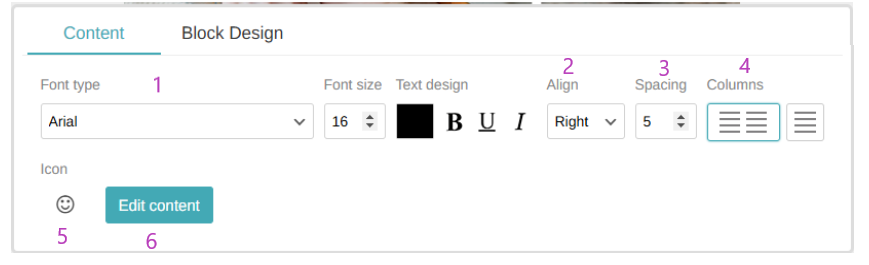
- Bullets – A modular component that displays a list of key points alongside an icon. This feature enhances content readability.
After dragging the component into the template, clicking on it will open an editing panel where you can:
Adjust the font style, size, and color (1).
Align or center the text (2).
Set the spacing between points (3).
Choose whether to divide the list into two columns or keep it in a single column (4).
Select the style, design, and color of the bullet icon (5).
Edit the content of each point (6).
- HTML Code – You have the option to add a pre-existing HTML code to the landing page.
- Share – This option allows your contacts to share your landing page on their social media.
- Video – You can add video links from YouTube or Vimeo by copying and pasting the URL.
Note: The video will not have an arrow so we recommend that you include an instruction to click on the image for it to play. - Gallery – Combine 2 pictures side by side.
- Form – This is an important element. The visitor leaves his details in the form according to the fields you choose (name, email, phone number, etc). This data will allow you to continue communicating directly and personally with your contacts. See Create and edit form guide
- PayPal – If you have a PayPal account, you can add a link to it here.
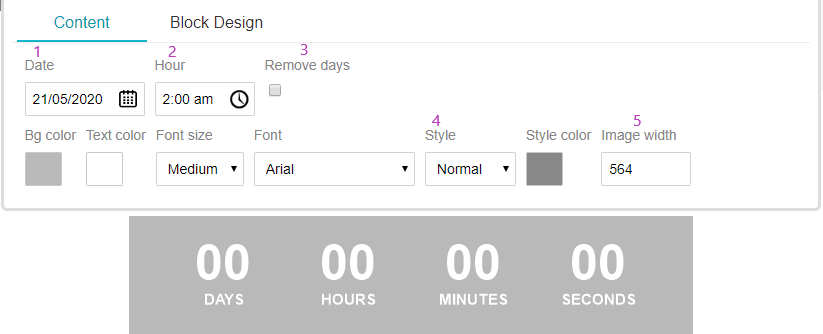
- Timer – You can add a live Countdown Timer element. To edit the timer, click on it. In the pane that opens you can update the target date (1) and target time (2). You can remove the day count and display only a stopwatch by checking the “Remove days” box (3). You can also edit the background color, font, clock configuration style (square or round) (4) and set the clock width (5).
- Saved elements – You can save elements you have designed and use them on your next landing pages. Click on the element that you want to save. In the menu that opens, click on the
“Add to saved elements” icon. Type the element’s name and save.
To add a saved element to future landing page, select it from the menu and drag it to the relevant location. - Add Area – You can change the template layout and adapt it to your design by dragging an appropriate area. At any stage of editing the landing page you can divide the template into two, three or four columns.
At the top of the editor’s screen, there are 2 buttons:
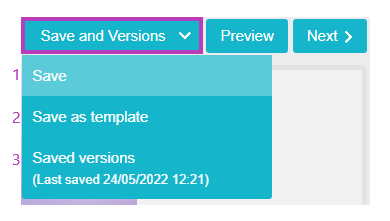
Save – Clicking on this button will save the changes.
Clicking the small arrow next to this button will allow you to restore recently saved versions (3) or save the formatting as a template in your account for future use (2).
Preview – Signup form preview on mobile and desktop.
Click “Next” to forward to the Thank You page.
2. Design a thank you page
After filling out the form, the contact is directed to the thank you page.
Clicking on the text will open the design pane for you to edit the text and design.
Options for designing the Thank You page:
- Design using existing templates – Select an existing template and design it as you want.
- Design the Thank you page based on your landing page – you can use your landing page template, and make changes and adjustments to the Thank you page.
- Redirect to URL address – directs the contact to a website such as home page, deals page or discounts page.
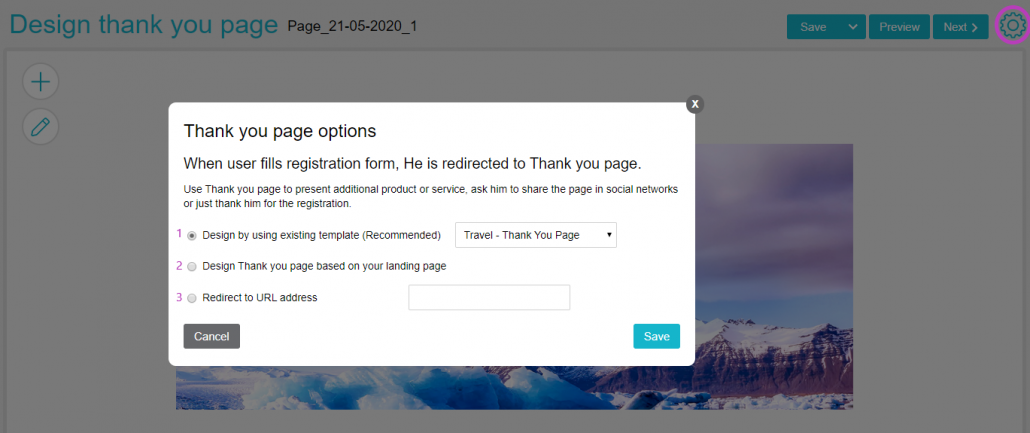
You can change any of the above options by clicking on the gear icon in the upper right corner of the screen.
Finally, click on “Save” or “Continue”
3. Settings & Publication
Landing page’s name (1) – Type the name of the landing page. This is the name that will appear in the landing pages list.
Choose how to publish this page – to publish a landing page you have to create a URL for it.
There are 4 options to publishing a landing page:
- As a page on inwise’s server – at the first publication, you’ll have to choose a domain name.
– Insert your domain name in the field (2). The domain name can be your Company name without the suffixes (com, co.il, net). If you don’t have a domain you can use any name you want – English letters only, no symbols or spaces. This domain name will remain fixed for all future landing pages.
– Page name (3) – create a name for the landing page – English letters only, no symbols or spaces.
The Landing page name can be edited at any time. An example of a correct URL address: http://inwisesuport.inwise.net/landingpage_new1 - As a URL on your website (CNAME) – update your Subdomain, for example: pages.yourdomain.co.il. Then request from your domain manager (Internet Service Provider, Private Company)
- a CNAME record that redirects your Subdomain to “for-cname-no-proxy.inwise.net”
- As an iframe
- As Html code
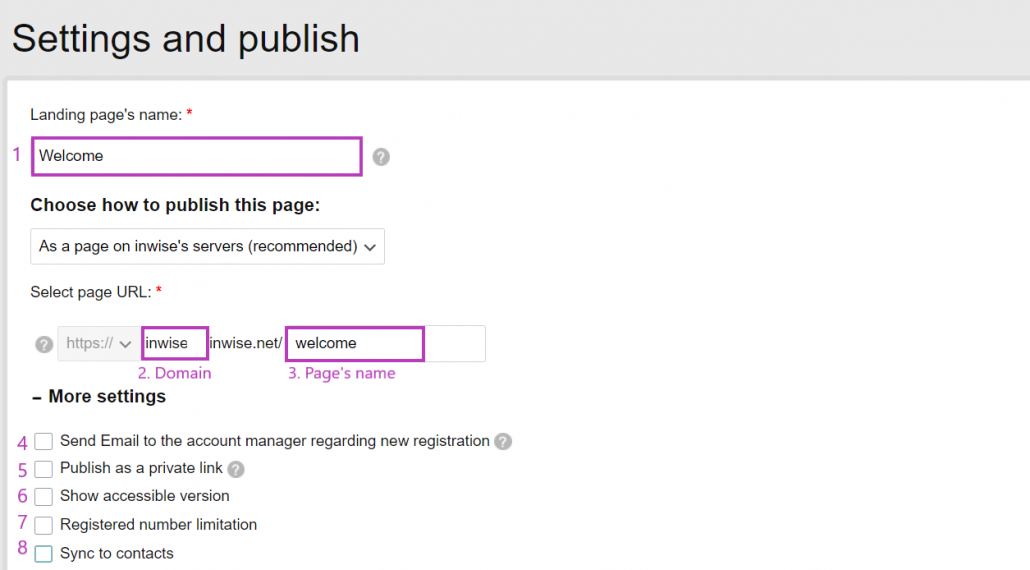
More setting:
4. Send Email to the account manager regarding new registration – checking this box will send an email to the address defined as Account Manager. You can update this email address on the final screen after the landing page is published, by clicking on “Edit Automation”. See the Automation Guide for more information.
5. Publish as a private link – selecting this option will add encoding to the link and allow access to the page using code only.
6. Show accessible version – selecting this option will add an interface to the landing page that provides a technological response to regulations and accessibility laws.
7. Registered number limitation – The system allows you to limit the number of contacts registered on the form (for conference/event). After reaching the limit you set, your contacts will see a relevant update/notice.
8. Sync to contacts – you can expand your distribution list and increase the number of leads by automatically importing all the contacts who completed the form directly to your contact list.
Checking the option “Update existing contacts” (slows down the import process) will update the data for contacts already in your account.First step – Mapping fields – Ensure that the information fields in the system are identical to the information fields on the form. This allows the system to automatically link the information entered on the form to the correct fields in the system. This ensures that the visitor’s first name will be updated in the first name field in the system and not in the email field. If the system does not detect the fields automatically, you can manually set the field name for each column mapped in the system.
The second step – Choose groups– choose a group from your list of groups, or create a new one.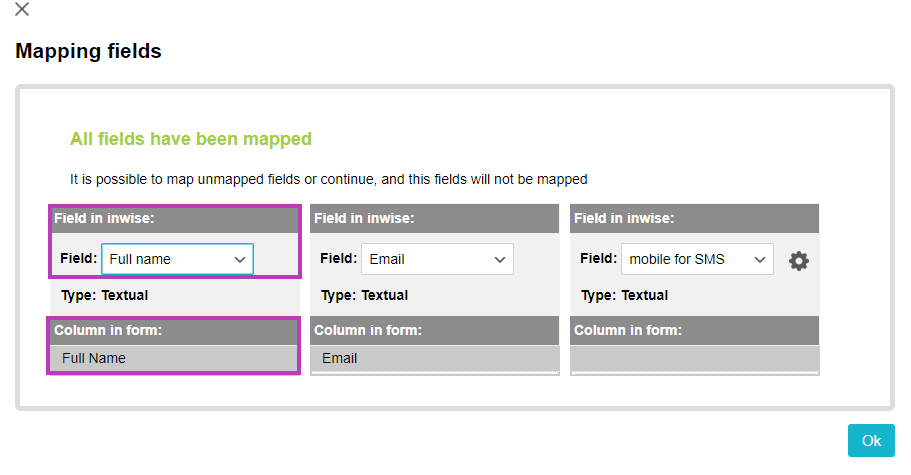 SEO (Search Engine Optimization) – Enable to promote landing pages on search engines (mostly Google).
Tracking code – embed different pixels for Retargeting or Remarketing the Landing page. After finishing, click “Publish”.
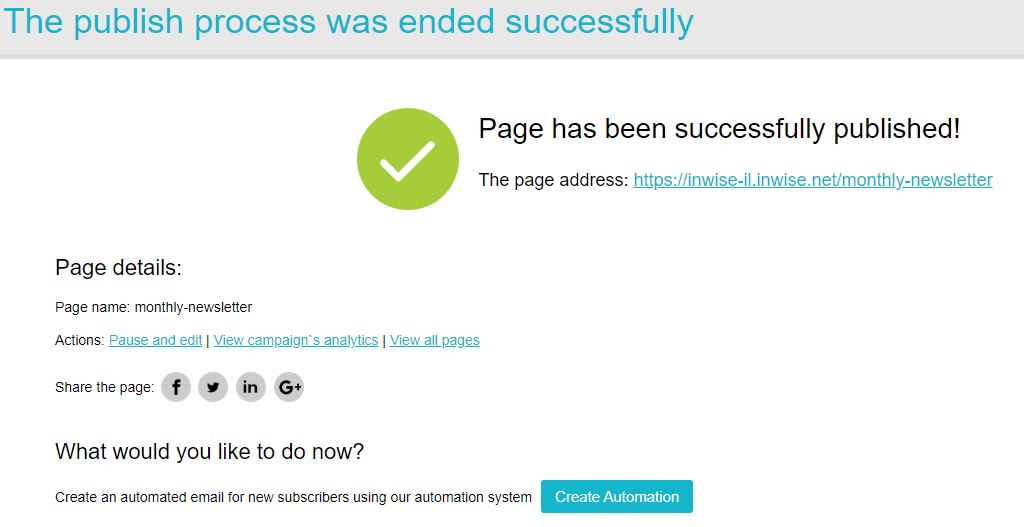
The landing page will appear in the “Pages and Forms ” list. Under each landing page there are 4 buttons:
Share – provides a link to the landing page, which you can publish (1).
Duplicate (2) – allows you to copy the landing page you have already designed so that you can use its design or content again without re-creating.
Pause (3) – While the landing page is paused its publication will be stopped and you can edit it.
Statistics (4) – View statistics (subscriber details). More details in the next step.
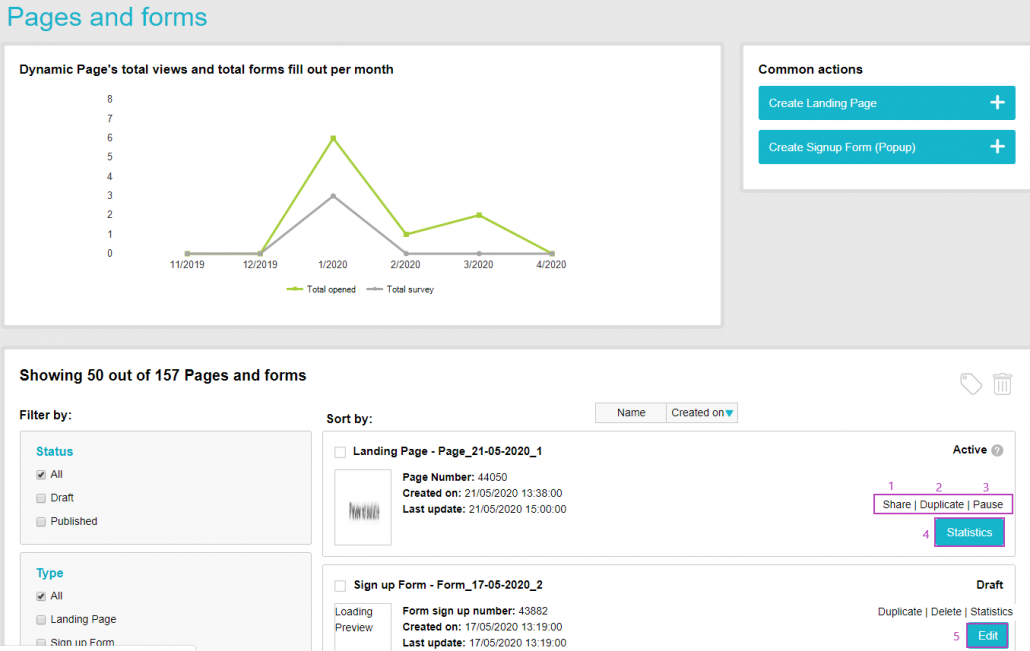
4. Analytics
In the graph at the top of the screen, you can see the amount of the landing page exposure (the green line), and the timeline (the gray line) per month.
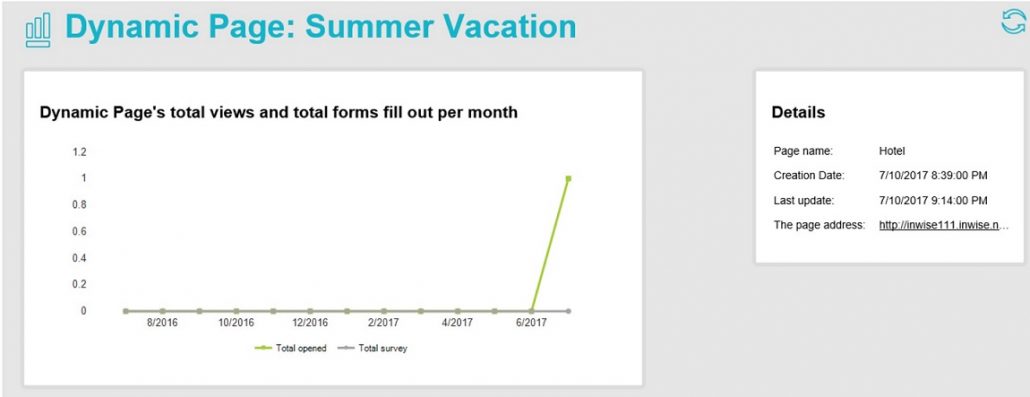
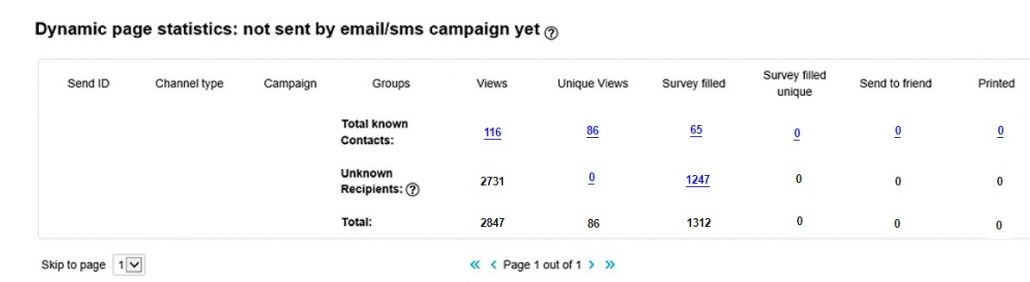
In the middle of the screen, you can see the page statistics:
- The landing page name and number.
- Views – total views of the landing page. Each time a contact views the landing page he is counted. If one contact views the form 3 times, he will count as 3 views.
- Unique views – the total number of contacts to view the landing page. Each contact is counted once, even if he views the landing page multiple times.
- Survey filled – total number of forms completed. Each time a contact completes the form it is counted. If the same contact fills out the form 3 times, it will count as 3 forms.
- Survey filled unique – the total number of contacts to complete forms. Each contact is counted once, even if he fills out the form several times. Click the rows to see the contact’s details.
What can be done now?
You published the landing page, visitors viewed it and some even filled it out, what can be done now?
Start creating communication and a personal relationship with your new contacts. As an example, send them a “welcome” email.
How do you do that? A guide to creating and designing an email campaign.