
Knowledge Base > Marketing automation > Customer journey – Webinar
You’ve worked hard to create a webinar that perfectly matches your customers’ needs, but how do you inform them? How do you handle registrations and remember them automatically and collectively, not one by one?
For this, there’s an Automation Interface – it can work for you and do the work on your behalf. You can create a customer journey and define the sequence of actions and the times at which you want them to happen.
Example of a customer journey:
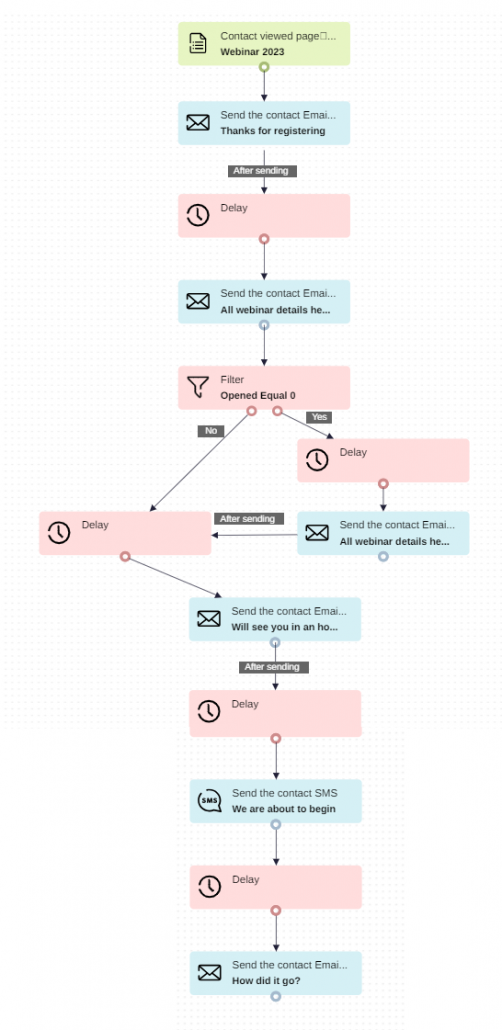
The journey begins when someone registers for the webinar through a landing page > Immediately, an email is sent saying, “We’re glad you registered for the webinar.” > One day before the webinar, a reminder email is sent > If someone doesn’t open the email, they’ll receive the same email again after 5 hours > One hour before the event, another reminder email is sent to all registered participants > 5 minutes before the webinar, an SMS is sent > Half an hour after the webinar, a survey on the webinar is sent out.
This way, you can automate the entire process, making it more efficient and effective.
The journey begins when a new member joins the ‘New Customers’ contact group > An email will be sent immediately saying, ‘Great that you’ve joined us > Simultaneously, an email will be sent to the account manager to inform him about the new contact > After three days, a discount code will be sent via email.
Plan the customer journey in advance, decide what you want to send and when, and create the relevant content accordingly:
Start by creating a landing page with information about the webinar.
Be transparent and avoid surprises: specify the webinar content, presenters, duration, and schedule. Additionally, add a signup form where can provide their email, phone number, and first name (try not to overload with required details, only request essential information to increase the chances of completion and prevent from being overwhelmed with too much data). You can share the landing page link on social networks, and various WhatsApp groups, and even include it in an email campaign you’ll send.
Immediately after registering for the webinar, send a thank-you email, reminding them of the event details and offering the option to save it to their calendar. Mention that the link to join the webinar will be sent one day before the date.
On the day before the webinar, send a reminder email and include the link to access it.
Filter – send to “didn’t open” – send the email again after 5 hours, only to those who haven’t opened the previous one.
On the day of the event, one hour before the scheduled time, send an email reminder. You can use a compelling email subject line to prompt action (our AI subject line generator can help with this).
Five minutes before the scheduled time, send an SMS reminder “We are about to begin”.
About half an hour after the webinar, send a survey to gather feedback. Send an email campaign with a link to a landing page containing survey questions.
How to create this automation
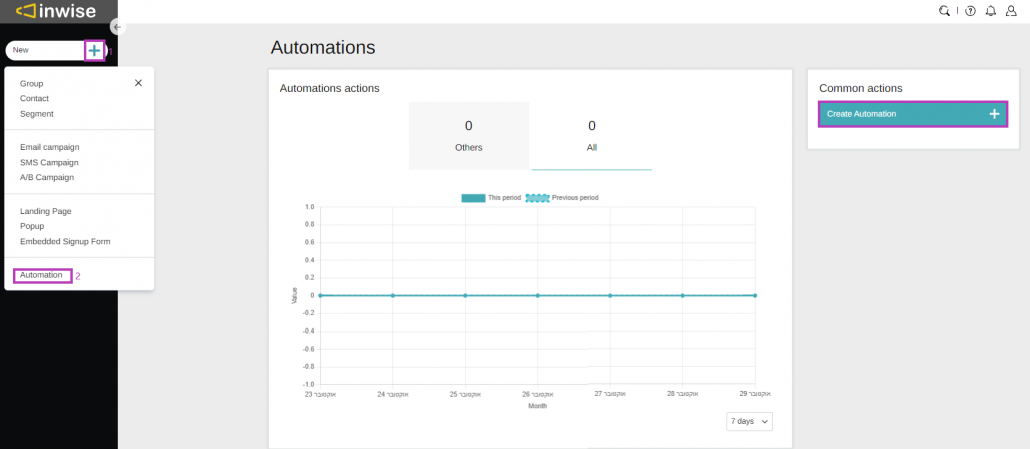
Create new automation, clock on the plus icon + (1), select “Automation” (2)
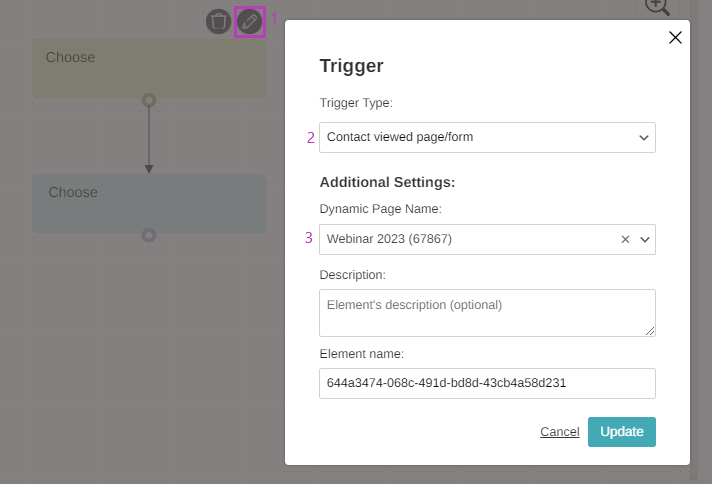
Edit the trigger by clicking the pencil icon (1).
In the “Trigger Type” field, choose “Contact viewed page/form” from the list (2).
In the “Dynamic Page Name” field, select the right page/form (3).
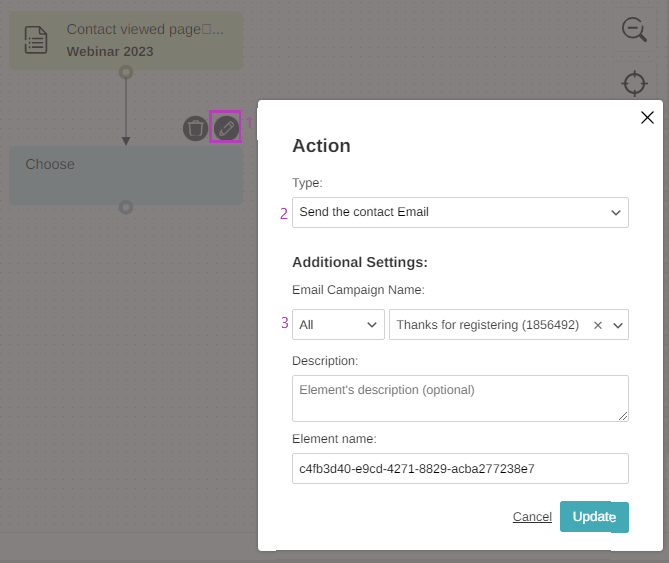
Right after someone registers, we want to send an email saying “Thanks for registering”
To do this, edit the action by clicking on the pencil icon (1).
In the “Action Type” field, choose “Send the contact Email” from the list (2).
In the “Email Campaign Name” field, select the relevant campaign (3).
In the next step, we would like, one day before the webinar, to send a reminder email to those registered for the webinar. To do this, we will drag the delay component to the automation editing window (the left, dashed window).
By clicking on the edit pencil (1), you will open the editing window, where you can select the date and time for sending the campaign (2).
Then, we will drag the arrow “after sending” from the action to the delay component (3).
**Since in this example, we want the email to be sent on a specific date, we will mark the”Schedule by date” (2) and select the exact date and time when we want the email to be sent. In cases where we want the email to be sent relative to the trigger’s execution, for example, one day after filling out the webinar signup form, we will choose the “relative schedule” and update it: 1 day.

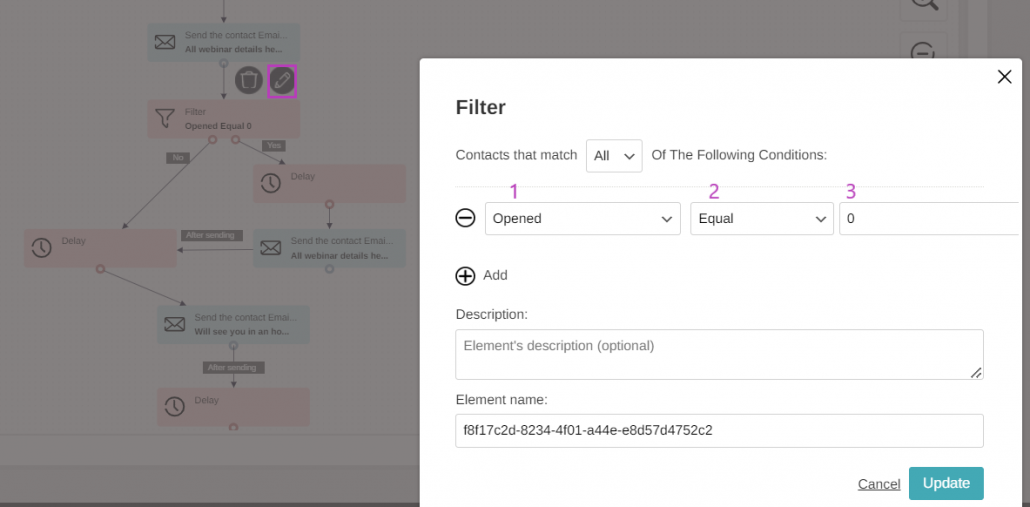
We want to send the email again to those who didn’t open the email. To do this, we will drag the “Filter” component, click on the filter icon, and in the editing window, we will filter by “Opened” (1). Set it to “Equals” to “0” – meaning, anyone who opened the email 0 times (in other words, anyone who didn’t open the email at all).
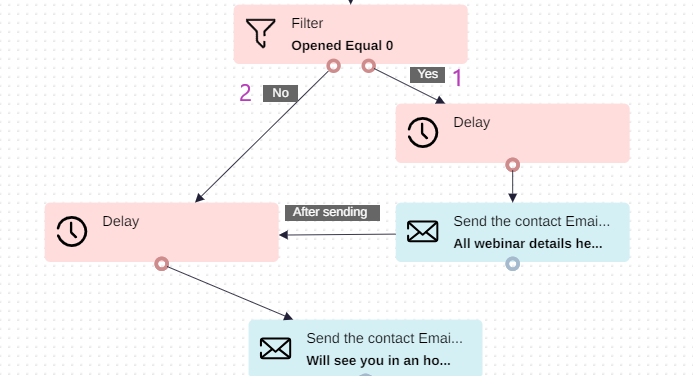
In the next step, we will drag two arrows from the filter:
1 – Yes – Anyone who meets the criteria (didn’t open the email) will receive the email “All webinar details here” again after a 5-hour delay and will then continue the customer journey.
2 – No – Anyone who doesn’t meet the criteria (opened the email 0 times), meaning anyone who opened the email, will proceed with the journey and will receive the email “One hour until we meet”.
And so on, we will continue to drag and perform actions and delays according to the customer journey we desire.
Good luck! 🙂