Knowledge Base > Pages and forms > Create and design Popup Forms
The popup can be a lead form, newsletter subscription signup, or update on a new service or product.
Implementing a registration popup form on your site guarantees that you will automatically expand your contact list in your inwise account, thereby increasing your number of leads and sales.
With inwise, you can easily create a popup without investing in development or design.
Steps for creating a popup
- Design a popup form
- Design a thank you page
- Popups settings
- Install a pixel (tracking code) in your site.
1. Design a popup form
On the main login screen, click on the “Pages and forms” tab in the main menu bar on the left (1).
Next, on the “Common Actions” menu click on the ”Create Popup” button (2).
You can also select “Create Popup” directly from the main menu bar.

Choose your preferred template.
You can choose a designed template from inwise’s selection, or design a new popup from a basic template

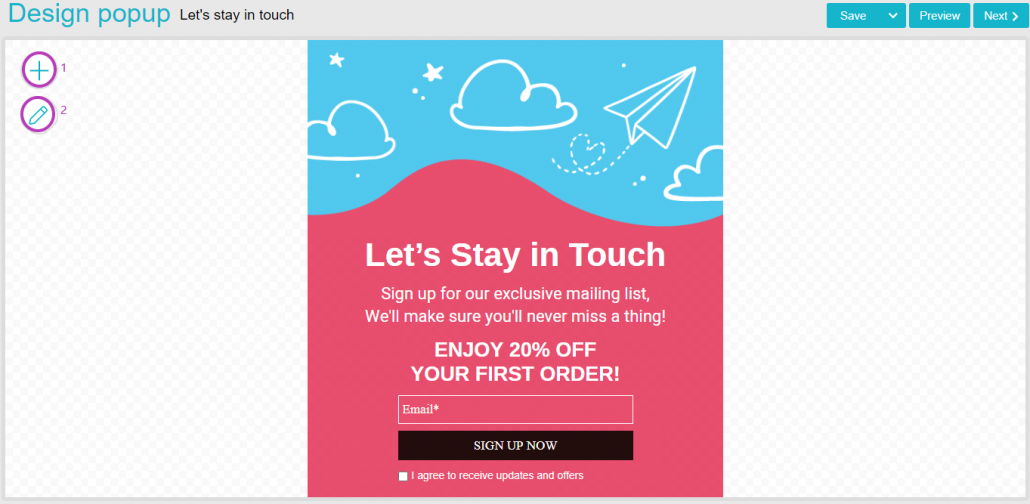
After selecting the template, the popup editor will open. Here you can edit and format the content, embed images and design the form.
You can learn more about the content editor in the “Create and design signup form” guide and more about thr forms editor in the “Create and Edit Form” guide.

After you are finished designing your popup form, click on the “Next” button.
2. Design a thank you page
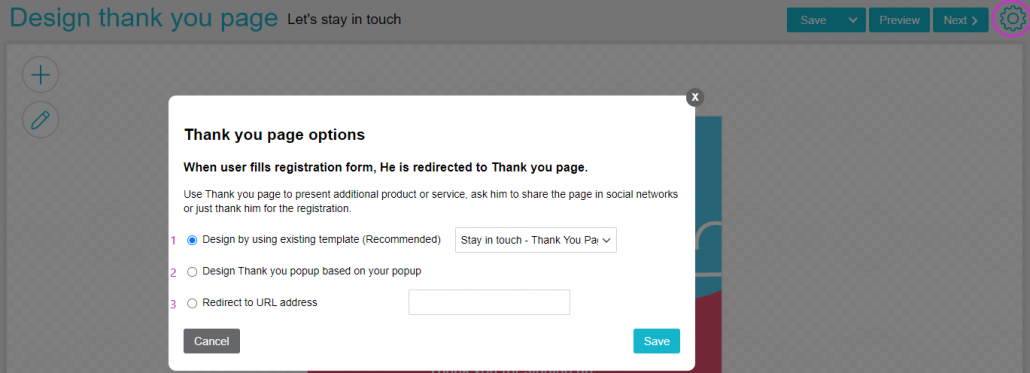
After filling out the form, the contact is directed to the thank you page.
There are 4 options for designing the “Thank You” page:
- Design using existing templates – Select an existing template and design it as you want.
- Design the Thank you page based on your landing page – you can use your landing page template, and make changes and adjustments to the Thank you page.
- Redirect to URL address – directs the contact to a website such as home page, deals page or discounts page.

- You can change any of the above options by clicking on the gear icon in the upper right corner of the screen.Finally, click on “Save” or “Continue”.
3. Popups settings
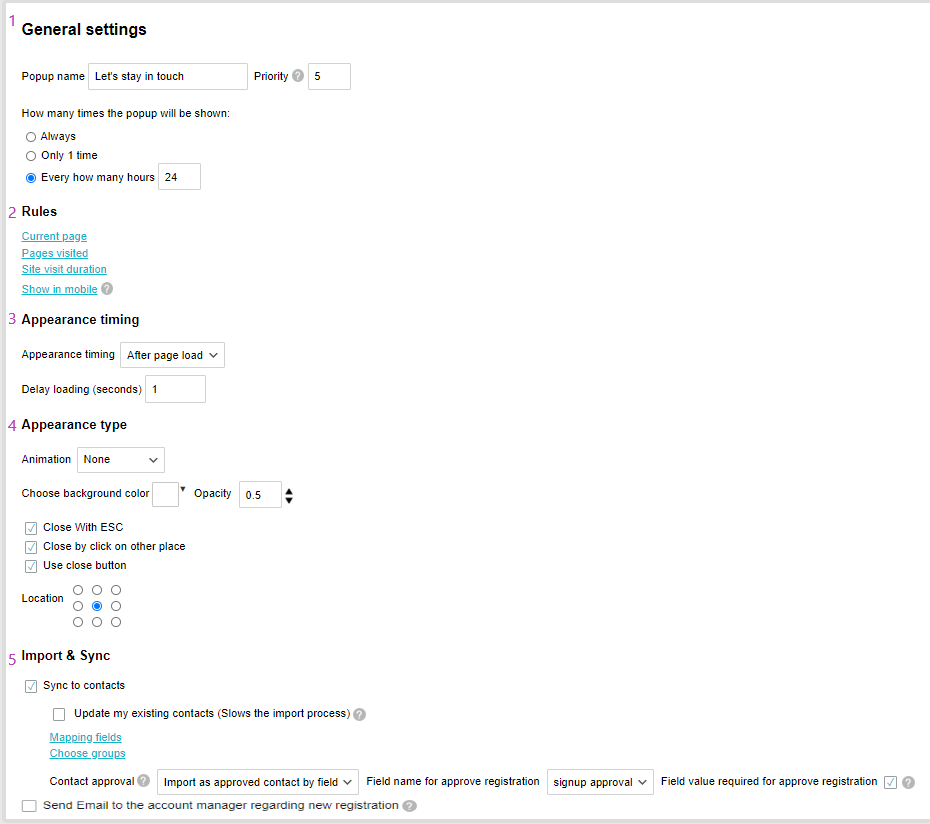
- General settings:
Popup name – This is the name that will appear on the “Pages and Forms” list. It is internal only.
Priority – If you have several popup forms for a specific page, you can set the priority for each of them. The popup with the highest priority will be displayed. The higher the number, the higher the priority.
The number of times the popup will be displayed – Select the frequency of the popup’s appearance. The default is every 24 hours.
Rules
-
Current page – You can define the site pages on which the popup will appear. Enter the relevant pages’ URLs, separated by commas.
Pages visited – You can set a popup that will appear only after your visitor has viewed specific pages on your website. Enter these pages’ URLs.
Site visit duration – Set a popup that will appear after your visitor has been on your site for a specific period of time. - Appearance timing
You can select the trigger that initiates the pop-up, such as after the page loads, when the visitor’s activity on the page stops, or after the visitor has scrolled for a half page or a full page. You can only choose one of these options.
You can also choose the popup’s appearance type (stable or blinking), background color and opacity. Additionally, you can choose between several options for closing the popup and positioning it on the page after it is displayed
- Import & Sync
You can automatically expand your distribution list and increase your number of leads by automatically importing all the contacts who filled out their details in the form directly to your contact list in the inwise system, or to a new group.
* Checking the option “Update existing contacts” (which slows down the import process) will update the data for contacts that were already entered in the account.
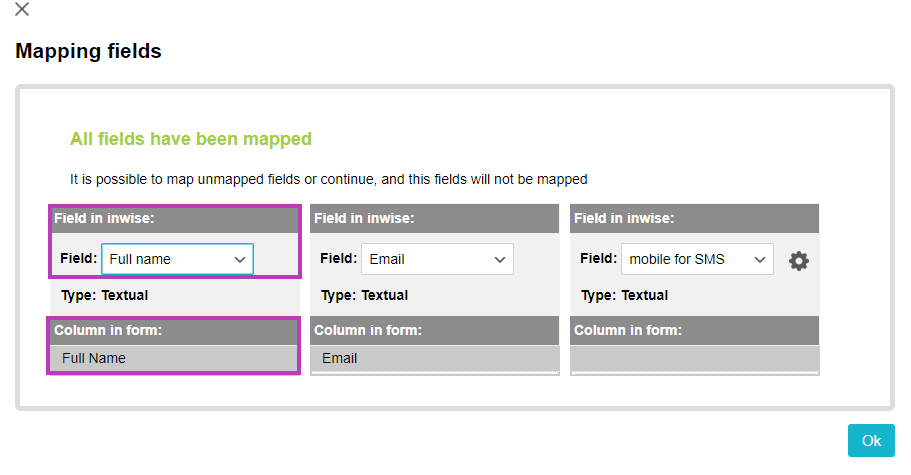
Step one: Mapping fields – Make sure that the information field in the system is the same as the information field in the form so the system can automatically link the information entered by the visitor to the correct field in the system. If the system does not detect the fields automatically, you can manually set the field name to which the column is mapped in the system.
Step two: Choose groups – Choose a group from your existing list, or create a new one.

Send Email to the account manager regarding new registration – Check this box so that the account manager receives an email every time a form is filled out. The updated email will be sent to the email address defined as Account Manager.
You can update the email address on the final screen after the landing page is published by clicking on “Edit Automation.” For more information, check out the Automation Guide.
After you finish with the import settings, you can publish the form by clicking on the “Publish” button at the bottom of the screen.
4. Install a pixel (tracking code) in your site.
Now, you just need to install the tracking code by adding a short section of code to your website pages. The installation takes approximately 3 minutes, and it is a one-time install. There are two ways to create the code:
- Copy the code from the last screen of the popup creation process interface.
- On the black menu bar on the left side of the screen, click on the “Integrations and Developers” and select “Create Tracking Code”Paste the tracking code between the head tags on your website, meaning:
<head>paste the pixel here</head>
That’s it – your popup is published!What can you do now? You published the popup in your website, your contacts viewed it, and some of them even filled it out. What is the next step?
Start initiating communication and creating a personal relationship with your new contacts. For example, you can send them a welcome email.
How do you do that? Read about it here: A guide to creating and designing an email campaign
