
Knowledge Base > Campaign > Create a WhatsApp Campaign
Using inwise, you can send personal WhatsApp messages that include a personal note, put in a link to a designed landing page, add call-to-action buttons and receive analytics (which contact received the message, which contact clicked on the link, and more).
Sending WhatsApp messages can be carried out as part of a campaign sent to a contact list, as a single message to a contact, as part of a customer journey, or as an operational (transactional) message.
In order to send WhatsApp messages, there is an orderly process, partially carried out with Meta company and it includes several steps:
1. Setting up a Facebook Business Manager account
2. Opening a business sending account with Meta
3. Purchasing a virtual number and a WhatsApp messages package
4.Creating submission templates and having them approved by Meta
*inwise will assist you in each of these steps.
The steps for creating a WhatsApp campaign
1. WhatsApp Template Approval
2. Creating a campaign
3. Test
4. Sending the campaign
Step 1 – WhatsApp Template Approval
Why do you need to approve a WhatsApp message template?
Because WhatsApp is committed to protecting its users’ privacy and ensuring proper use of its app (e.g., spam prevention, content quality, user privacy, transparency), it requires that any initiated contact with users must be made through pre-approved text templates. The approved template text can contain parameters (personal fields) such as first name or birthday, call-to-action buttons, emojis, and links.
How do you send a WhatsApp template for approval?
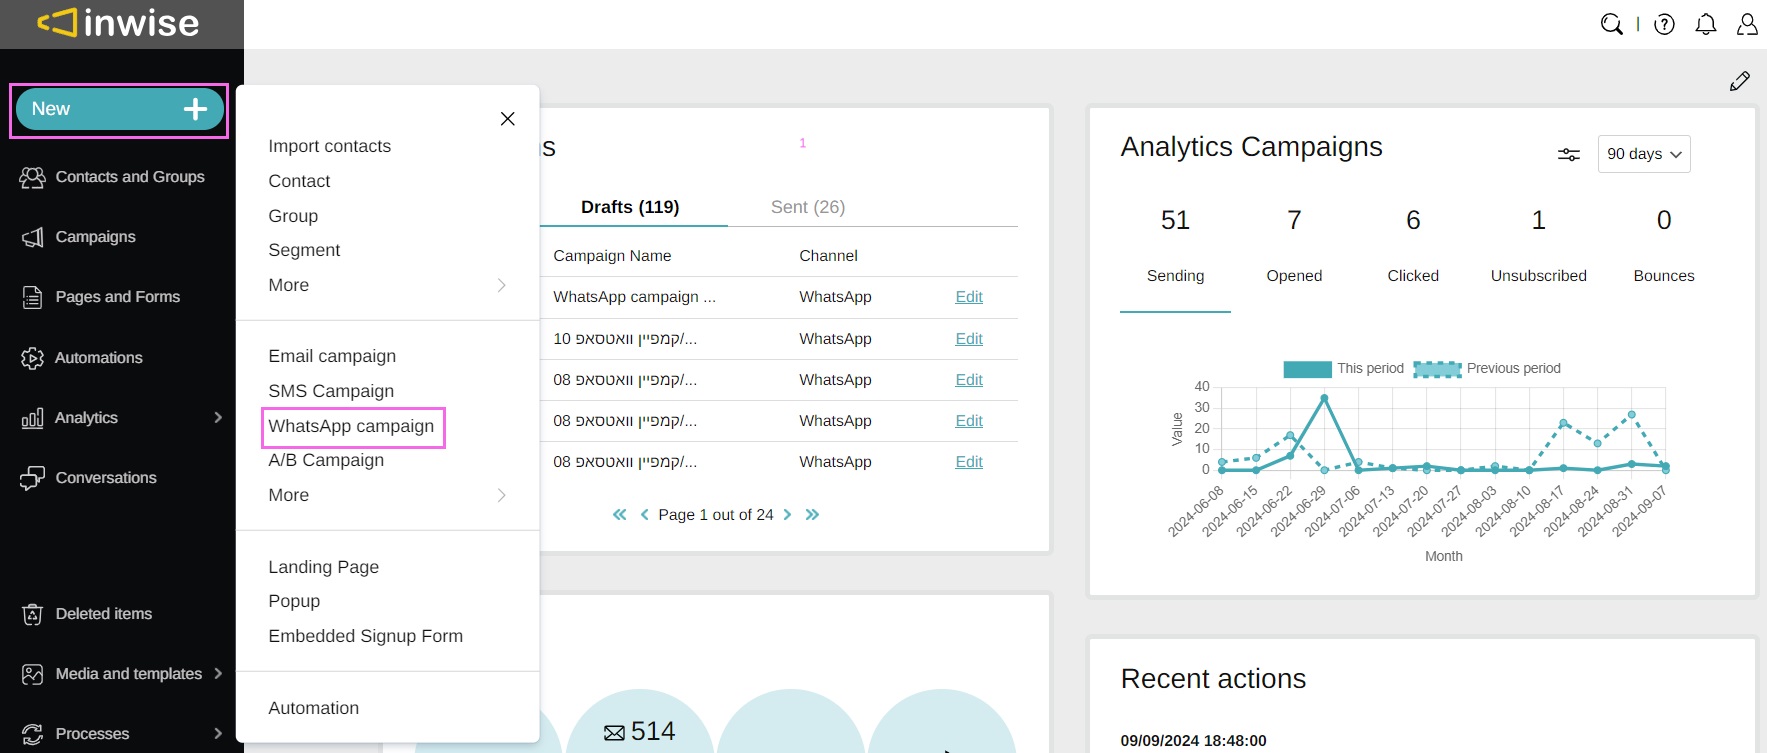
In the main entry screen (your account dashboard), click the “New” button in the menu bar on the left side of the screen .
A panel will appear, where you can choose what you would like to create. Select “WhatsApp Campaign”.
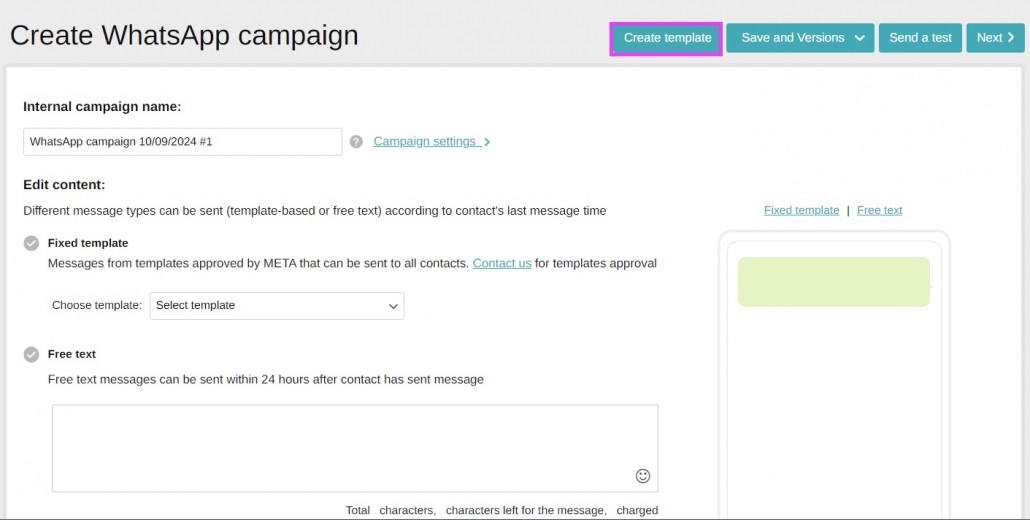
In the “Create WhatsApp Campaign” screen, click on the “Create Template” button.
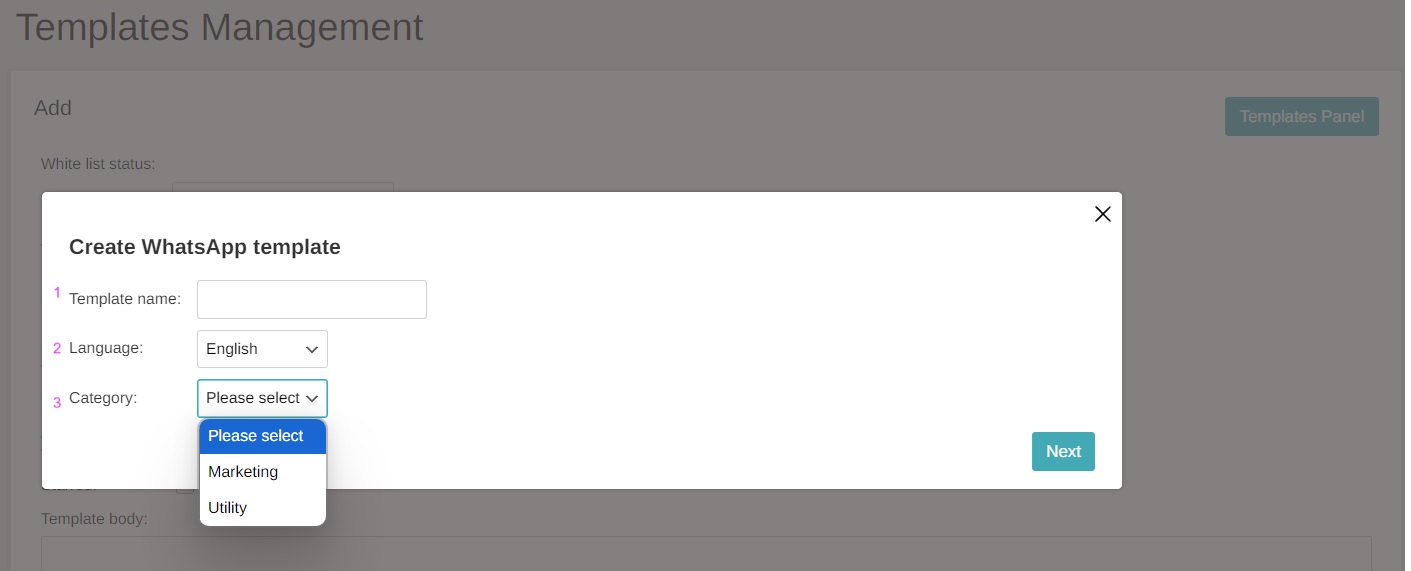
In the window that opens, update
Template Name (1) – The name can only contain lowercase English letters, numbers, and underscores (no spaces).
Language (2) – Hebrew/English, depending on the language of the message content you wish to send.
Category (3) – Choose the type of message.
Utility message (e.g., transactional updates, post-purchase notifications, invoice attachments), The approval time is longer.
Marketing message (any message that does not fall under the utility category), most messages belong to this category.
Finally, click “Next”
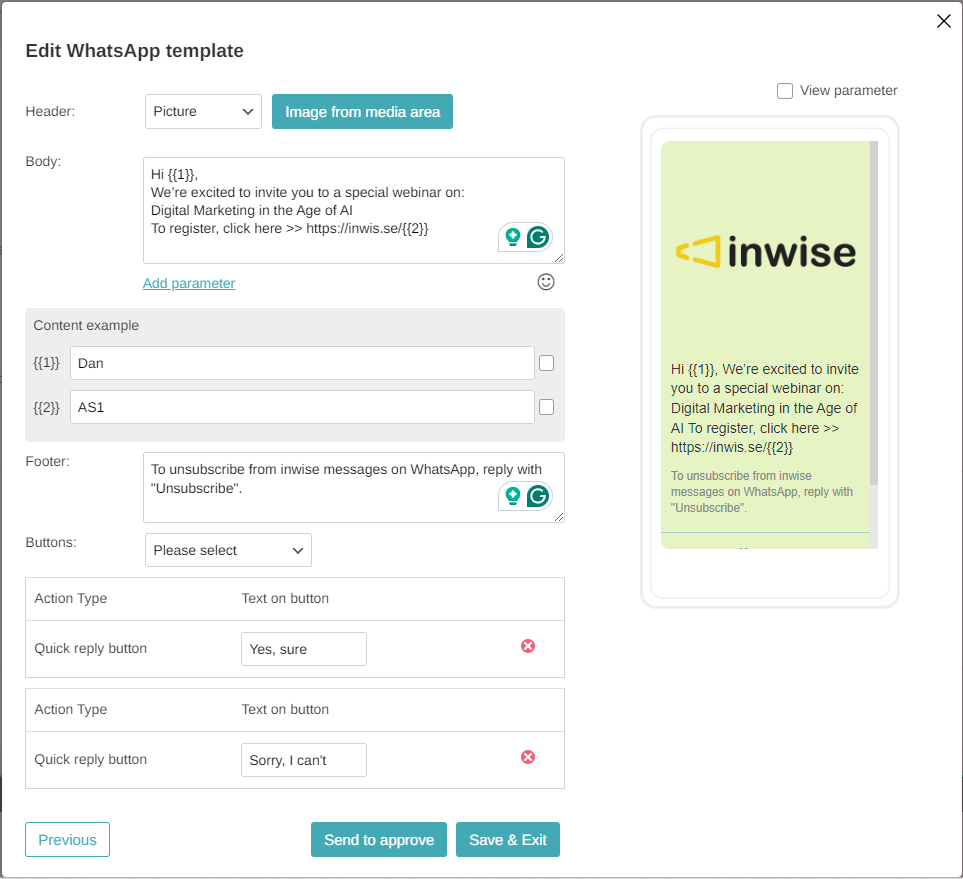
The next window, “Edit WhatsApp Template,” will appear:
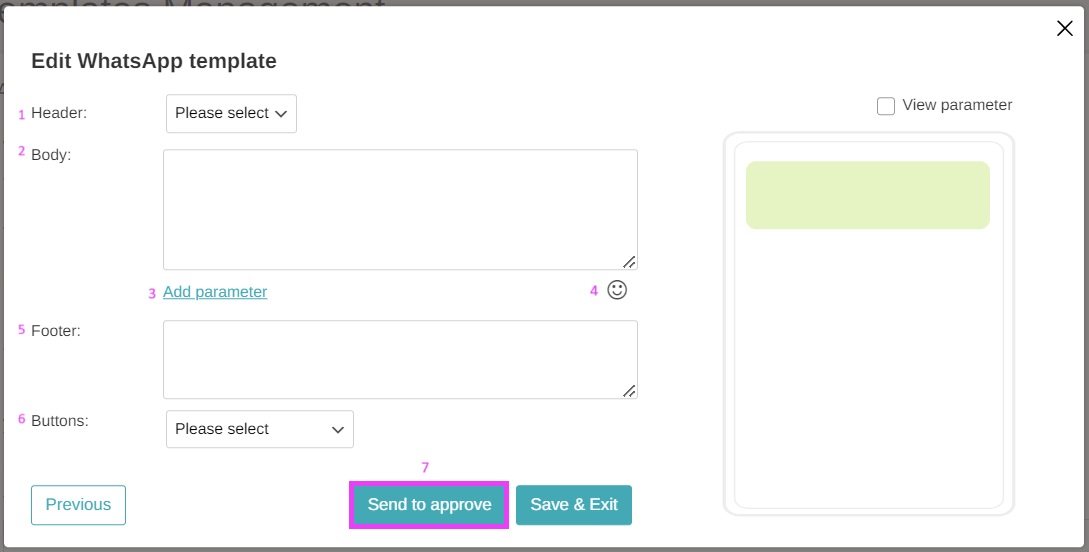
- Header – You can add a header to the message, either a bold text or an image, which will appear at the top of the message to capture the recipient’s attention.
Text – Enter concise text.
Image – You can select an image from the media area in your inwise account (images up to 1500×1500 can be used). - Body – Enter the message content you wish to send.
You can add emojis to the message (4).
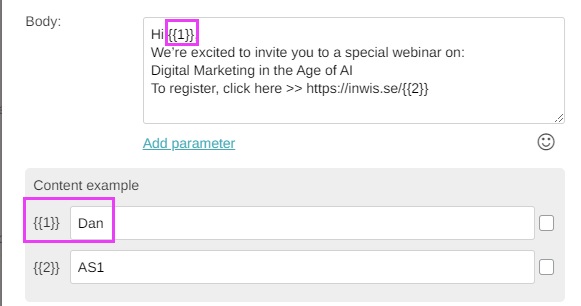
- Personal Fields – To add personal fields to the message, such as a first name, hover your mouse over the location where you want to insert the information and click on “Add parameter” (3).
The window will display {{1}}, but don’t worry, in the message sent to your contacts, you can choose which personal information to include there.
Once you add a variable, a “Content example” field will open. WhatsApp wants to ensure the content you plan to send, so you must enter an example there. For instance, if there’s a first name field, provide a sample first name.
- Adding Links to URL Addresses (website/landing page, etc.)
- How do you add a link to a fixed URL?
Simply type the URL address, e.g. www.inwise.co.il. - How do you add a link to a fixed URL with the option to track how many clicked on the link?
Type the prefix https://inwi.se and add a personal field at the end (click on “Add parameter”).
It will look like this: https://inwi.se/{{2}}.
*Later, after the template is approved, during campaign creation, you will update the information that will appear in each of these variable fields. - How do you add a personal link? A link that can change for each contact (e.g., linking to a personal invoice or a personal coupon code)?
Type the prefix https://inwi.se and then click on “Add parameter.” The following URL address will be displayed (without spaces): https://inwi.se/{{2}}.
*Later, after the template is approved, during campaign creation, you will update the information that will appear in each of these variable fields.
In the “Content example” field, enter text with uppercase letters and numbers in English without spaces, and check the checkbox in this field.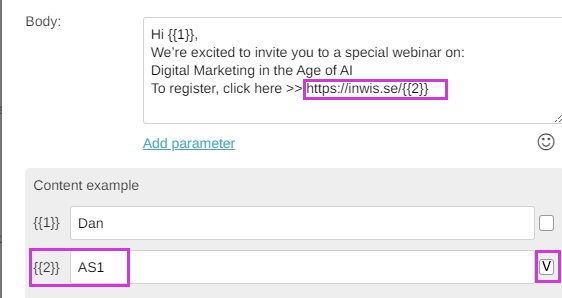
- Later, after the template is approved, when editing the campaign for sending:
To add a link to a fixed URL with click tracking, type the relevant URL in the “Field Value” box, check the checkbox next to this field, and also check the click tracking checkbox.
To add a personal link, select the relevant information field (e.g., coupon code) in the “Field Value” box, check the checkbox next to this field, and you can also check the click tracking checkbox to know how many clicked on the link.
5. Footer – This is the bottom part of the message, displayed in light text. The footer is usually used to display additional or complementary information, such as contact details, thanks, or small notes, or an opt-out option.
6. Buttons – You can add buttons that will appear below the message body, allowing the recipient to perform a direct action from the message. The types of buttons you can add:
- Visit Website – You can update the address of a website or link to a landing page. When the recipient clicks the button in the message, they will be directed to the updated address. (You can add up to 2 of these buttons in a single message).
- How to add a link to a fixed URL?
Update the text you want to appear on the button. Choose the URL type “Static” and enter the URL address you wish to direct to.
Note: You cannot get click-tracking statistics for a static button. - How to add a link to a fixed URL with the option to track how many clicked on the link?
Update the text you want to appear on the button. Choose the URL type “Dynamic” and enter the prefix https://inwi.se. - How to add a personal link? A link that can change for each contact (e.g., linking to a personal invoice or a personal coupon code)
Update the text you want to appear on the button. Choose the URL type “Dynamic” and enter the prefix https://inwi.se.
- How to add a link to a fixed URL?
If you choose the “Dynamic” button, the “Content example” field will open, where you must enter text with uppercase letters and numbers in English without spaces and check the checkbox in this field.
For example, you should type: https://inwi.se/RA1.
Later, after the template is approved, when editing the campaign for sending:
To add a link to a fixed URL with click tracking, type the relevant URL in the “Field Value” box, check the checkbox next to this field, and also check the click tracking checkbox.
To add a personal link, select the relevant information field (e.g., coupon code) in the “Field Value” box, check the checkbox next to this field, and you can also check the click tracking checkbox to know how many clicked on the link.
- Quick Reply Button – When the recipient clicks the button in the message, their response will be sent to you, which you can view in the “Chats” screen.
- You can continue to manage the conversation directly with the recipient from the chats.
- You can create automation that will trigger based on the button they clicked. For example, if they click on the “Sure, I’d love to attend” button, automation will be triggered, where the contact will be added to the “RSVP Confirmed” group and receive an email with further details. For more information on creating automations, refer to this guide.
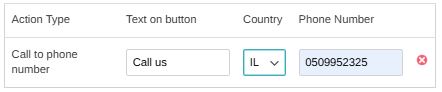
- Contact by Phone – Clicking on this button will initiate a call to the phone number you updated.
Example of How This Message Editing Will Look:
- Calling a Phone Number – When the recipient clicks the button, a call will be initiated to the defined phone number.
You have to choose whether the phone number is in Israel (IL) or the United States (US).
Phone number format: 05XXXXXXXX
What to Pay Attention To:
- Any change in the message content will require re-approval of the template with WhatsApp, even if it’s just a punctuation mark.
- You can only submit one correction every 24 hours (otherwise, you need to create a new template and submit it for approval).
- Line breaks may vary between different phone types, so the preview display may not be accurate.
After editing the message, click “Send for Approval.”
Now, a preview of the message will open. If the message is correct, click “Send to approve” and the message will be sent to WhatsApp for approval.
Generally, marketing messages are approved immediately
***f you click on “Save & Exit” – the message template you created will be saved as a draft and will not be submitted for approval to WhatsApp.
Now, you will be forward to the “Template Management” screen, where you can see the approval status of the template you created:
Approved– The template has been approved.
Pending – The template is under review.
Step 2 – Creating campaign
To continue with sending the WhatsApp message, click on “Campaigns” in the black menu bar on the left side of the screen. From the campaigns list, select the last WhatsApp campaign you created and click “Edit” (or create a new one).
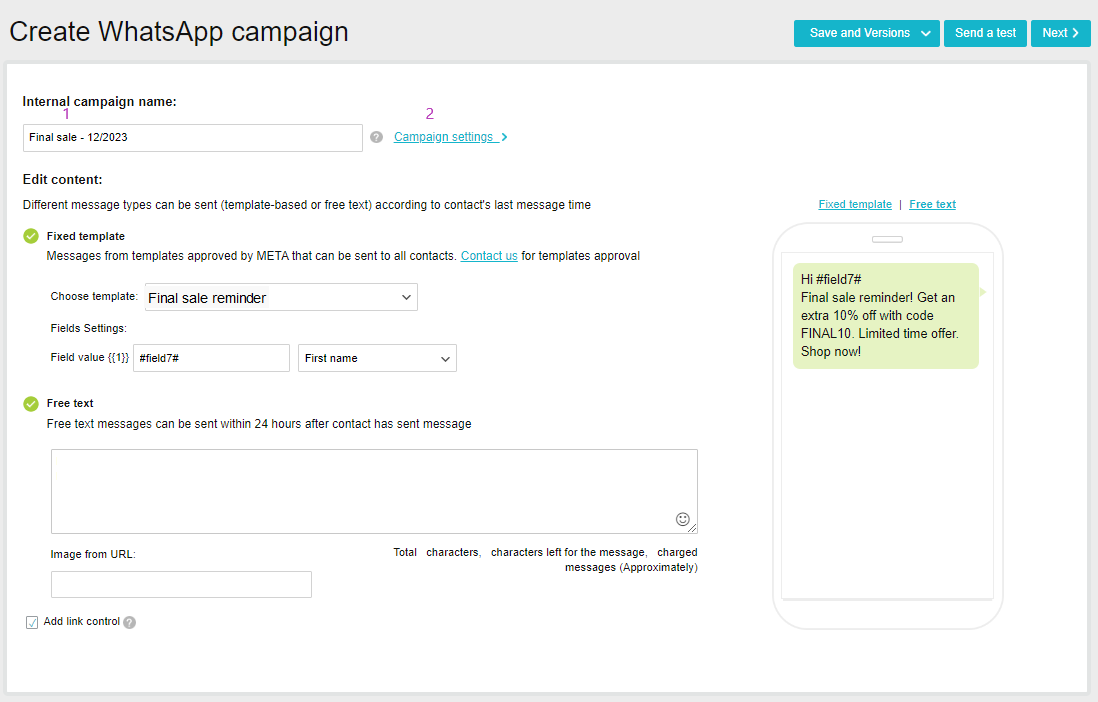
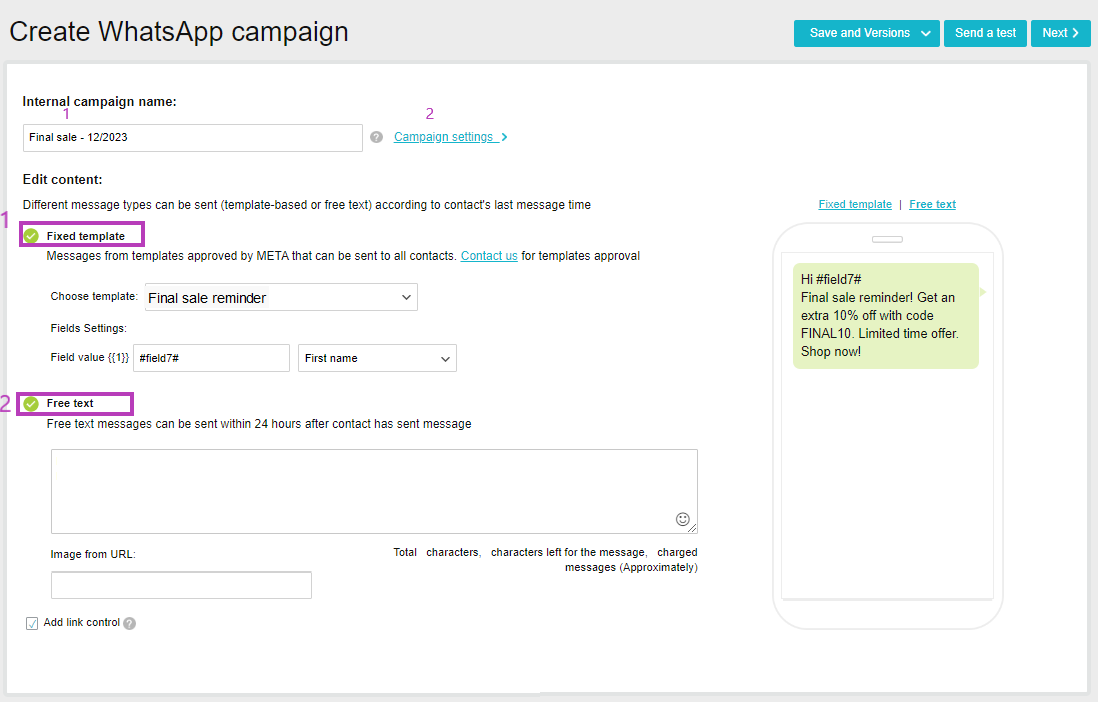
- Internal Campaign name – Enter name to your campaign – this name used for internal purposes only, which will appear in your account under the campaign list.
- Campaign settings – the following are fixed settings at the account level:
The name of the sender to be displayed – the name of the sender from which the messages will be sent. This information is already defined when opening the sending account with META and cannot be changed.
Encoding – ISO 8859-1 is designated for messages in English or other languages such as Russian or French.
Valid – a 24-hour countdown clock, starting from the moment the message is sent to the contacts (from the moment a contact responds to the message, you have a 24-hour window in which you can send them “free” messages – free text without using templates).
There are 2 options for sending a WhatsApp message:
Template message (1)
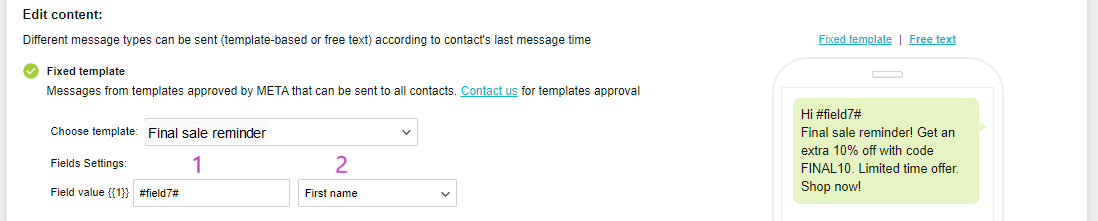
Choose the template message you approved in the previous step. If the template contains personal fields, you need to set the content that will appear in those fields.
Defining fields –
- You can select from the personal fields in your account what value of the contact will appear in place of the placeholder {{1}}, such as first name or birth date.
This information is drawn from the contact details stored in your account. Learn how to configure these fields in this guide. - You can set a constant value that will appear for all recipients in place of the placeholder {{1}}, such as a link, event date, event time, or a link to a landing page.
Why is this useful? If you use this template for different events where only some information changes, or if you are unsure about exact details (such as the event time), this can save you from needing to reapprove the template every time.
- If you added a fixed encoded link to the template (for click-tracking analytics): `https://inwi.se/`, enter the full link address in this field (2) and check the box next to “Add link control”
- If you added a “Visit Website” button with a dynamic address, enter the full link address in this field (2) and check the box next to “Add link control”
*In the message preview, the personal field number {{1}} will be displayed, but don’t worry, your contacts will receive the message with their personal information.
Free message (2)
For those of your clients who responded with a WhatsApp message back to the business – you have a 24-hour time window in which you can also send “free” messages (free text) without using templates.
Add link control
In case you attach a link to the message, it is recommended to monitor and control the clicks on the link so that you can generate statistical information. By checking this field, encodes your link and enables tracking and control.
Step 3 – Test
While editing the message and after finishing drafting it, you can see a preview of the message, but you can also send the message for testing (to yourselves and/or to a group you define) so that you can verify its correctness before sending it to your contacts.
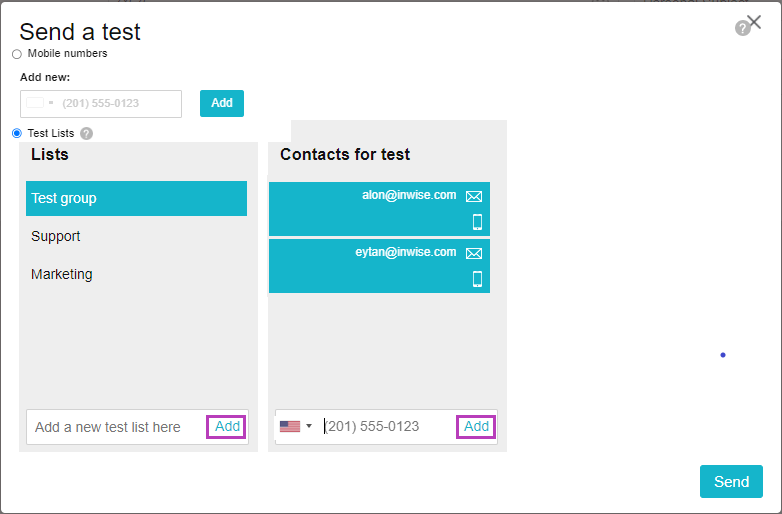
After clicking on “Send a test” the message you edited will be saved and a screen will open where you can select the contacts and mobile phone numbers to whom you wish to send for review:
- Sending the message to a one-time phone number (1). Enter the phone number to which you want to send the message for review, click on “Add” and finish click on “Send”.
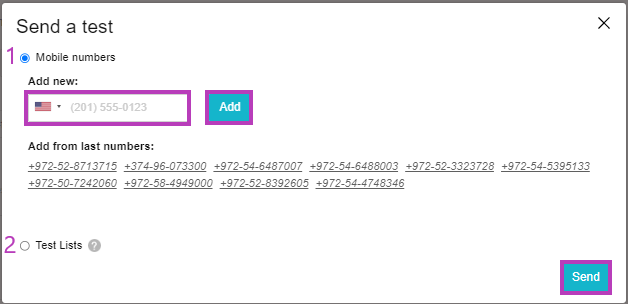
- Defining contact lists for sending messages for approval (2). So that you don’t have to update the phone numbers to which you wish to send the test-out messages each time, you can create predefined lists:
- Lists – update the name for the test groups (contact lists). To finish, click Add.
- Contacts for testing – in this section, you can update the mobile phone numbers relevant to the group you have defined. To finish, click Add.
- Clicking on the contact details will open a panel where you can add the contact details as first name. When you send it for test, if there are personal fields, those will be updated.
- Clicking on “Send” – the message will be sent to the mobile phone numbers in the selected test group.
At this stage, the campaign is still being edited, so if needed, you can go back and modify the message, or go ahead and send it to the contact list.
Step 4 – Sending the campaign
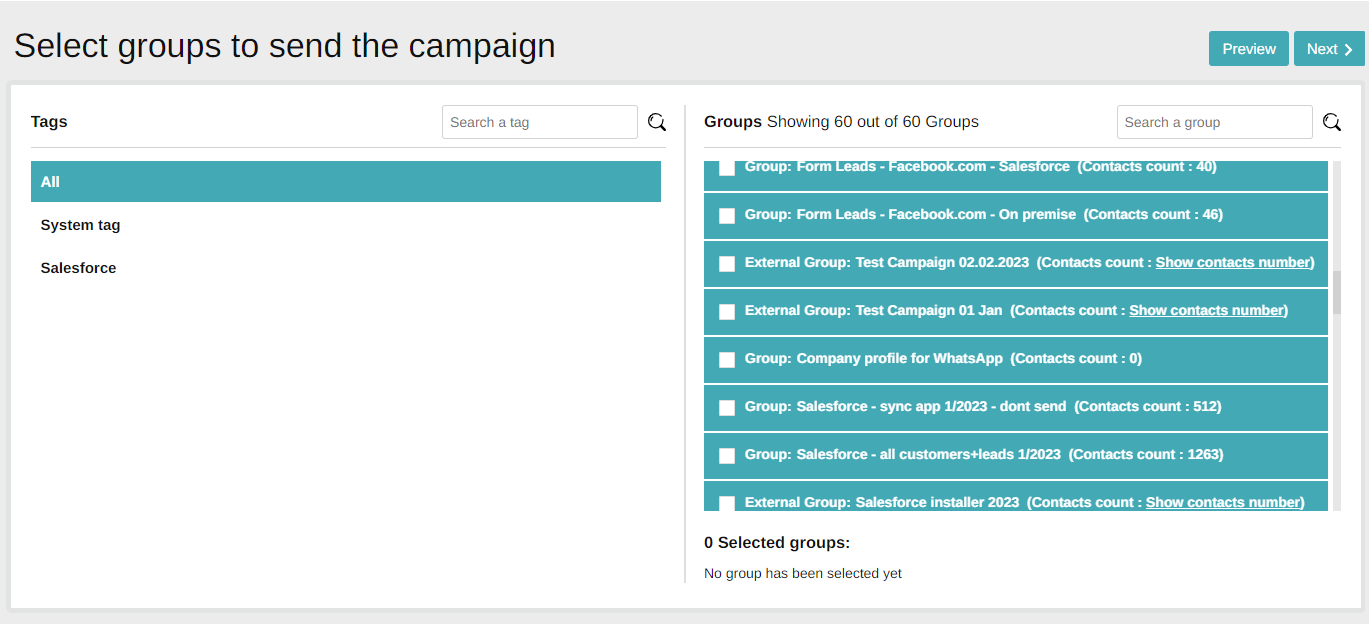
Select the groups to which the campaign will be sent by marking the relevant group. The added groups appeared at the bottom of the table.
We are at the last stage, just before sending the campaign to the contacts.
At the top of the screen are the campaign details – make sure all the details are correct and up to date. You can click on the magnifying glass to see a preview of the message – to correct any mistakes before sending the message.
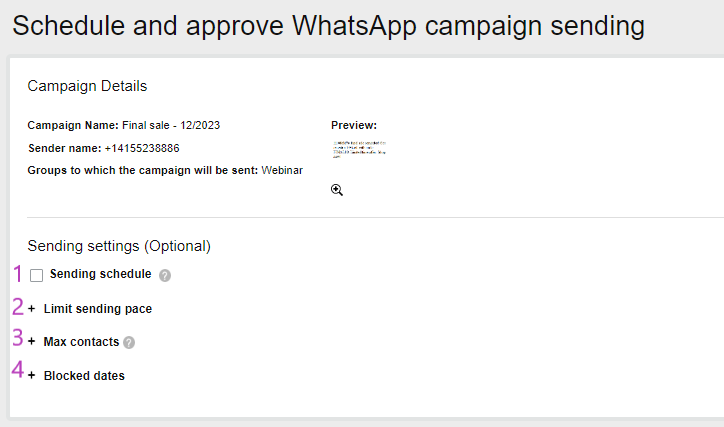
Send settings
Schedule sending – if you want to schedule the sending of the campaign for a later date, check this field and choose the date and time at which you would like to send the message.

Limit sending pace – it is recommended to limit the sending rate and define the number of contacts that will receive the message per hour/day, for more information.
Maximum contacts – if your list of contacts is large and you want to limit the number of sent messages, you can set the maximum number of contacts to whom you wish to send messages. The sending will be carried out in the order in which the contacts appear in the group and will stop when it reaches the limit number of your set. Since WhatsApp limits the number of contacts to whom the message can be sent according to the rating of the account, it is recommended to set the maximum according to the sending level of your account – for more information.
Blocked dates – you can define what hours and days the message will not be sent (for example on weekends and at night) – for more information.
*Please note – the campaign enters the sending queue in the system, it will be sent only after it has been examined by the inwise team.
To sum up
To view all the campaigns you have created in one place, click on “Campaigns” in the main menu bar on the left. A list of all your campaigns you have created will open and next to each campaign their status will be displayed (sent, in progress, draft), their creation date and when they were last updated. You can preview them by clicking on the image.
What is the next step? It is important to continue to tighten the relationship with your recipients. You can create a customer journey using marketing automation. For example: you can define that as soon as a certain recipient clicks on a link describing a product in the WhatsApp message you sent them, that recipient will be automatically added to the list of clients interested in that product. After two days they receive an email about a sale on the same product. If they purchased the product, you can define that after 14 days they will receive an invitation to rate that product and so on.
How do you do that? Marketing automation