
Knowledge Base > Marketing automation > Automations – V2
This is how you can create customer journeys that combine the various marketing channels: pop-ups, registration forms, landing pages, emails, SMS messages, and WhatsApp message
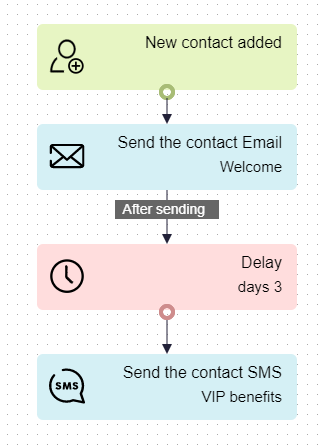
An example of marketing automation:
The system has identified a new registrant through a signup form/landing page/pop-up > immediately sending a Welcome email > if the contact opens the email > 3-day delay> sending an SMS with a discount code
Creating automation
We will demonstrate how to create the above automation.
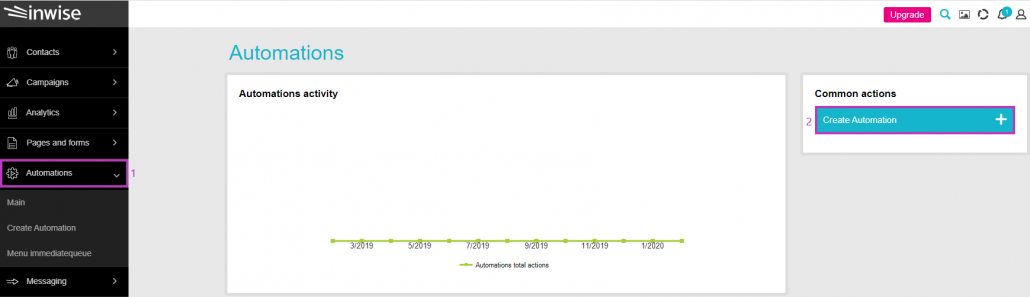
On the main login screen, click on the “Automations” tab in the main menu bar on the right side of the screen (1).
A “Common Actions” window will open on the left, click on “Create automation” (2).
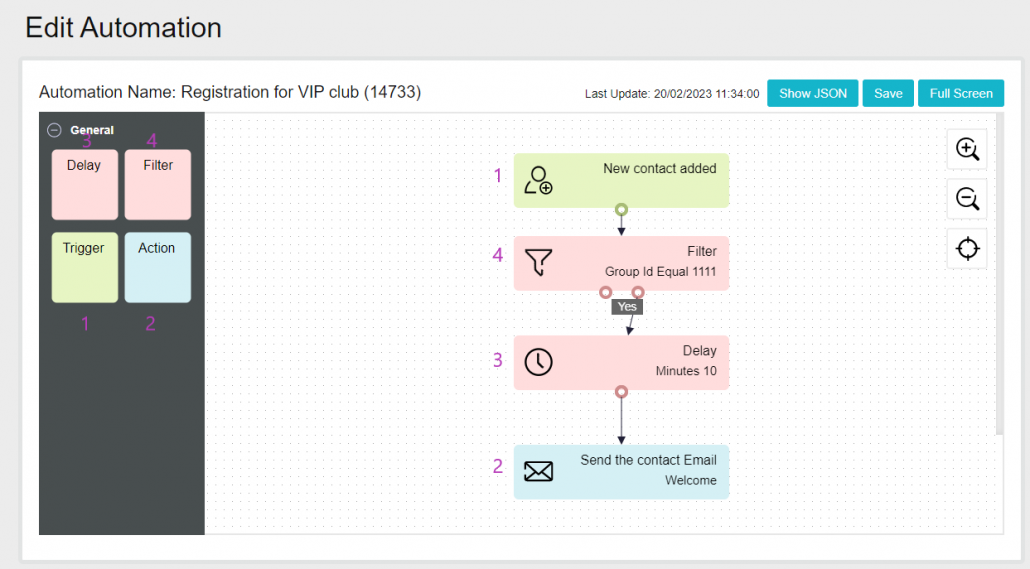
Every automation starts with a trigger (1) leading to actions (2).
- Trigger- is the cause of initiating the action, the cause that activates the automation (a new contact in the system).
- Action – the action to be performed after the trigger has occurred (sending an email).
Adding a trigger (1) and an action (2) to the automation is made by dragging the elements from the left window to the Automation Editor (the dotted right window).
In order to link components (trigger – action, pause, filter) click on the green circle below the trigger and drag an arrow in the direction of the action.
Editing the Trigger
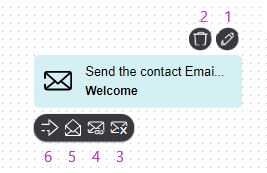
You can edit the triggers and actions by clicking on the pencil button (1) and delete them by clicking on the trash button (2).

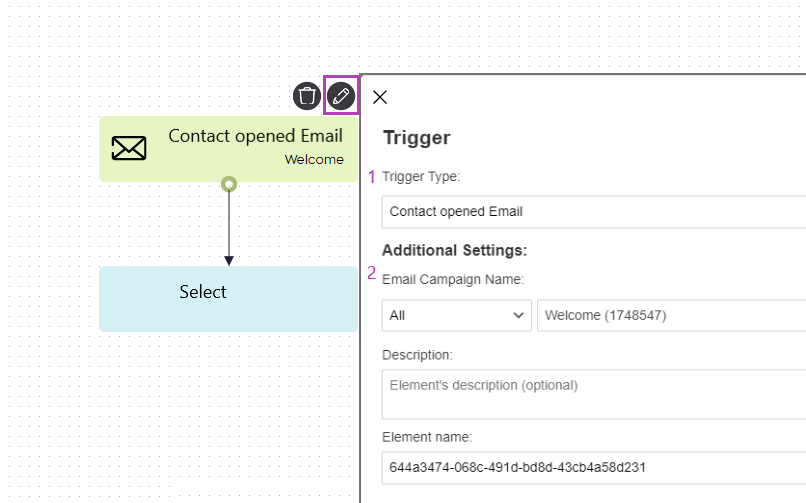
For example – the scenario we will define is that every new contact in the system will receive an email. By clicking on the pencil button (1) the trigger editing window will open
Type of trigger (1) – choose a trigger from the list of triggers offered by the system. In this case we will choose “Contact opened email.”
Further settings (2) – this field will open only in certain triggers. Depending on the type of trigger, you can choose the name of the campaign/landing page/pop-up/name of the group it refers to from the list as well as the automation we wish to operate.
For example, in case the trigger is “contact opened an email”, in the additional settings we can choose the name of the email campaign, which, if the contact opens it, will trigger sending them another email.
To finish, click on “Update”
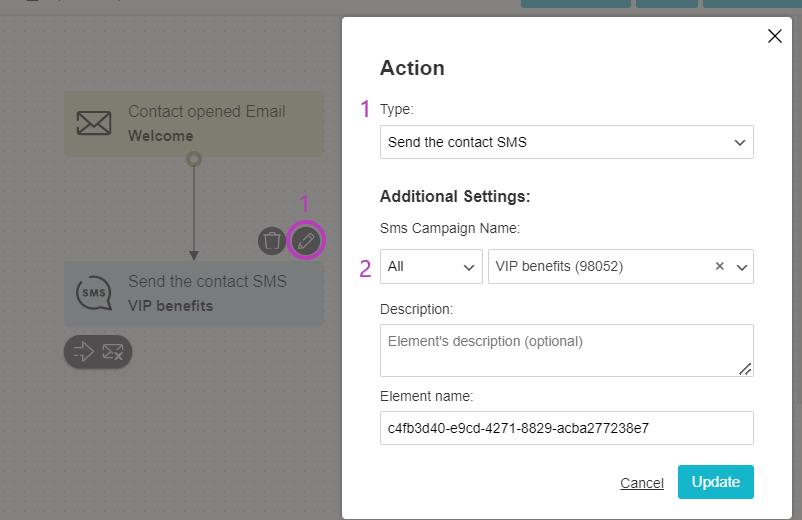
Editing the action
Once we have set the trigger, the scenario, we can set what action we want to happen.
For example, sending a text message with a discount code.
Meaning, everyone who opened the “Welcome” email will receive a text message with a discount code.
By clicking on the pencil button, next to the relevant action (1), the editing window will open.
Type of action (1) – choose an action from the list of actions type offered by the system (send, register, remove, update, highlight, import, etc.). In this case, we will choose “Send the contact SMS.”
Additional settings – depending on the type of action, we will choose the campaign/landing page/pop-up/group name that we would like to activate from the list.
For example, for the name of the campaign, we will choose the campaign that will send “VIP benefits.”
To finish, click on “Update”
Editing the timing
After dragging the Delay element to the editing window, by clicking on the pencil button, the editing window will open. There, you can define the timing of the action (1). It can be defined by minutes/hours/days/weeks.
The action can be scheduled for a specific time (2).
You can choose for the action to not be performed on certain days (3), for example on weekends.
In this example, three days after opening the email, a text message will be sent at 10:00, but not on Sunday and Saturdays.
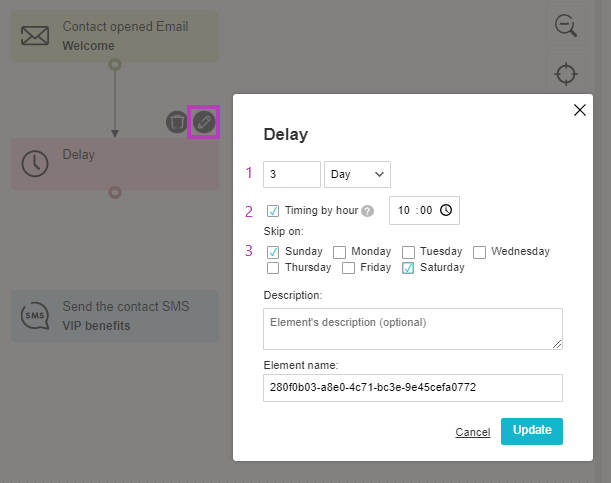
* A timed action will be displayed in the analytics of the automation as “Queueג” until it is completed.
Editing the filter
Various filters can be activated in order to, among others, determine the segmentation of the con
tacts to which the automation will apply.
After dragging the filter to the editing window, by clicking on the pencil button, a window will open in which you can set the conditions under which the action will take place.
You can choose whether the action will take place only when all the conditions are met or when only some of them are met, at least one (1).
Additional conditions can be added by clicking on the “plus” icon (+).
In the following example, we set the action of the automation to only occur if the contact clicked “0” times on the link in the email, i.e. did not click on the link in the email, so we will make sure they did not use the discount code we sent them.
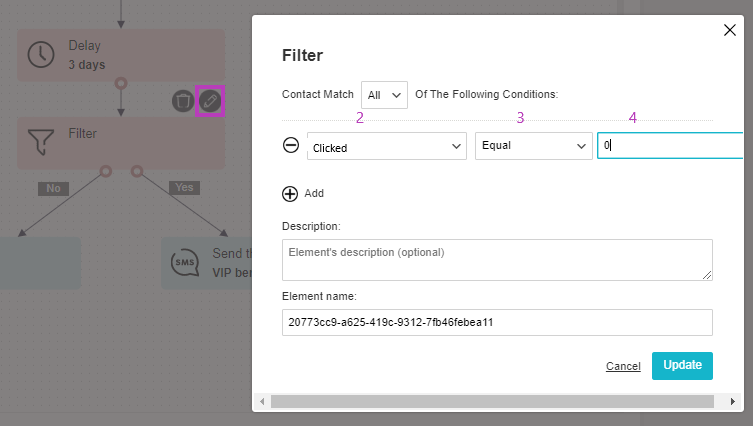
You can also define what will happen if the condition is met as opposed to a scenario where the condition is not met.
For example, if the contact “Yes” clicks “0” times – you will send them an SMS with a discount code, and if the contact clicked “No” “0” times (meaning, they did click on a link and may have even used the discount) they will receive another email (for example – an offer for complementary products).
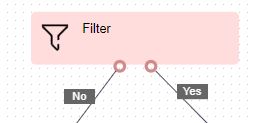
By clicking on one of the following options and dragging an arrow to the next action, you can create a continuation of automation and define additional actions, such as sending another email to the contact.
1. After sending – after sending the previous email,
2. After opening – upon opening the previous email
3. After clicking – clicking on a link in the previous email
4. After fail – the email is not actually sent due to reasons such as a wrong email address or a full inbox.
Activating the automation
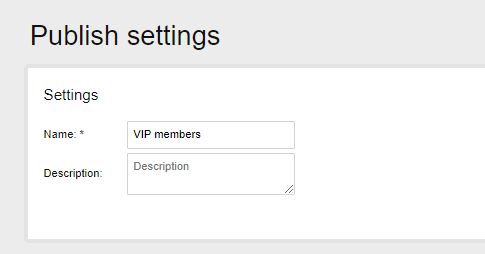
Once finished editing the automation, click on the “Next” button in the lower left part of the page. In the Publish settings screen that will open, you can update the name of the automation and add a description for internal purposes only.
To activate the automation, click on the “Publish” button on the lower left side of the screen. You will immediately receive the notification “The automation was successfully created”.
In order to edit or stop the automation after publishing it, in the menu bar, click on “Automation”. The list of automation will open (the active as well as those in draft mode), in the panel of the relevant automation, click on the “Pause” button.
The automation status will switch from “Active” to “Draft”, in this status, you can delete, edit or reactivate the automation.

Analytics
In the automation panel, you can click on the Analytics button and view the total number of actions performed in that automation.
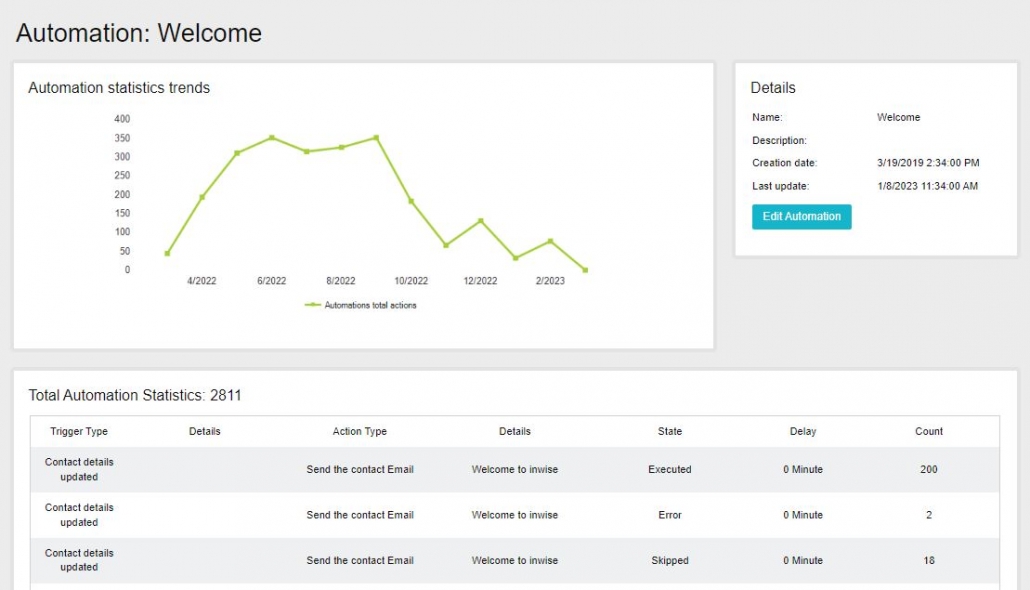
Status column:
- Error (1) – in case the action failed and was not performed. To see the cause of the failure, click on this line, in the screen that opens in the “Details” column you can see the reason for the failure to send. For example, the contact has removed themselves from the mailing list.
- Performed successfully (2) – if the action was performed successfully
- Skipped (3) – each campaign (email and/or SMS) will be sent only once to each contact. You can see in the analytics area of the automation marking these cases as “Skipped”.
- For example, if we set up an automation that by filling out a registration form for the conference, the contact will receive a confirmation email regarding their registration, if the contact filled out the form twice, they will receive only one confirmation of their registration. The Analytics will show “Successfully executed” once and “Skip” for the second time.
Please note, if a contact information is updated after the action has been performed and the automation has been activated, the automation will not be updated accordingly.
For example, automation where if a contact fills out a form, a text message is sent after 3 days. If during these three days, the contact updated their phone number, the automation will not be updated accordingly. In this case, the text message will be sent to their old phone number as it was registered in the system.
What is the next step? Building and designing an email campaign and managing it using marketing automation.
How do you do that? The guide for Creating an email campaign