
Knowledge Base > Campaign > Create an SMS Campaign
Preliminary Step – One Time Setup
Before sending SMS messages for the first time, you must define the sender number or sender name from which the messages will be sent.
This way, the recipients will know who the message is from.
To do this, log into your inwise account, click the small person icon at the top right of the screen, and select “Account Settings.” From the left menu, choose (1) “SMS Sending,” and then the top tab (2) “SMS Number/Sender Name.”

- Adding a Sender Number
In the phone field (3), enter the phone number in the format 972-5X-XXXXXXX and click “Add Sender Number.”
The number will be added to the table, and a code will be sent to verify ownership.
After entering the code, click “Verify.”
If successful, a green check mark with the word “Verified” will appear next to the number. - Adding a Sender Name
In the Sender Name field (4), enter the name you wish to display as the sender.
This name must be in English letters and without special characters. Then click “Add Sender Name.”
You must now complete a strong verification process for the sender name (due to Ministry of Communications regulations requiring approval to prevent spam).
What is strong verification? It refers to a video recording of an authorized signatory presenting two IDs, establishing a direct connection between the sender name and the account owner.
How to do this? Record a video of the authorized signatory (only) stating:- Full name
- Address
- Contact details (phone and email)
- Presenting two forms of ID (ID card/passport/driver’s license)
Send the video to support@inwise.co.il In the subject line, include the company name, registration number, and attach a confirmation that the person filmed is an authorized signatory.
Later, during campaign setup, you’ll be able to choose from which sender name or number the campaign will be sent.
Steps to create an SMS campaign:
- Create an SMS Campaign
- Edit the Message
- Send a test
- Select the contacts list
- Summary & send
Step 1 – Create an SMS Campaign
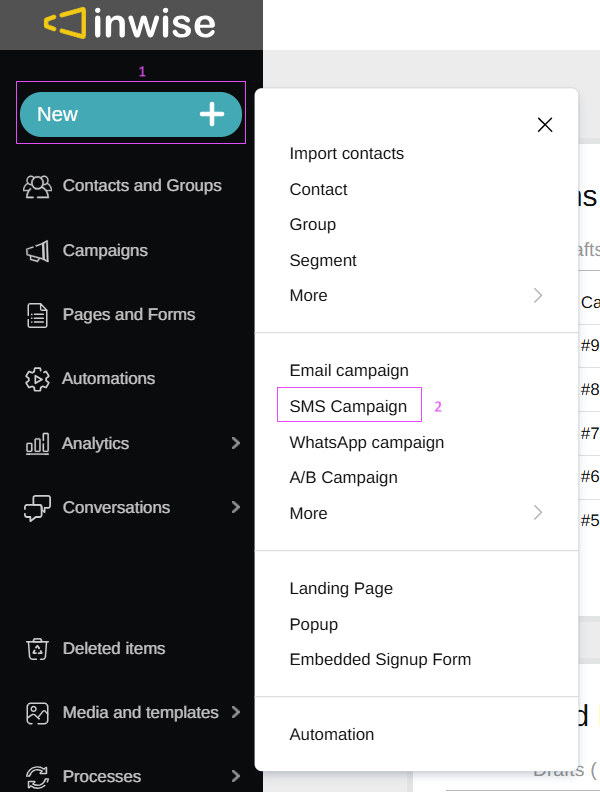
On the main dashboard, click the “New” button in the menu on the left (1). A tub will appear (2) where you can choose what you want to create. Select “SMS Campaign.
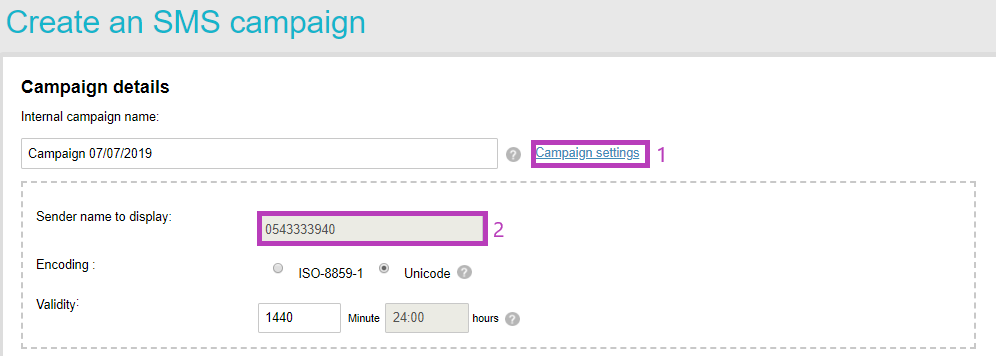
On the “Create an SMS campaign” page, define your campaign setting:
Internal campaign name – This is only for internal use. It will appear in the system’s campaign list, but it will not be visible to your contacts.
Click on “Campaign setting” (1), you can set the definition:
The sender’s name to be displayed – As explained earlier, you can now select from your verified names/numbers.
Encoding – Unicode is designated for messages sent in Hebrew and for words containing symbols that do not belong to the English alphabet.
ISO 8859-1 is designated for messages sent in English or other languages such as Russian or French.
Valid until – the maximal time, in minutes, provided to the system in order to try sending the message before it expires.
Finally, press “Continue” at the bottom of the screen on the left.
Step 2 – Edit the Message
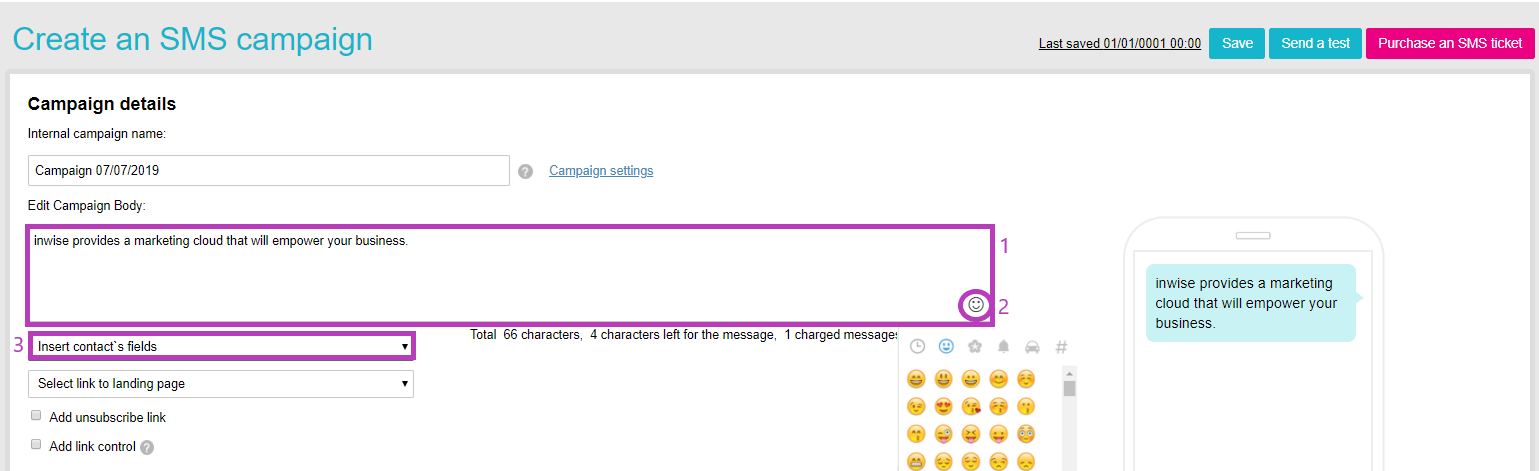
Now, you can type the content message you want to send.
Please note: A single standard SMS message contains 70 characters.
You can purchase SMS messages in various sizes. The pricing is calculated according to the number of characters in the message you are sending.
You can also add emojis to the text message (2).
It is recommended to add personal fields to the SMS campaign:
Hover over the position in the message where you want the personal field to appear, and select the desired field (3). The panel will display the name of the selected personal field, but don’t worry; recipients will receive a message containing their personal information. This is extracted from existing contact information contained in the system’s fields. To learn how to define these information fields, read this guide.
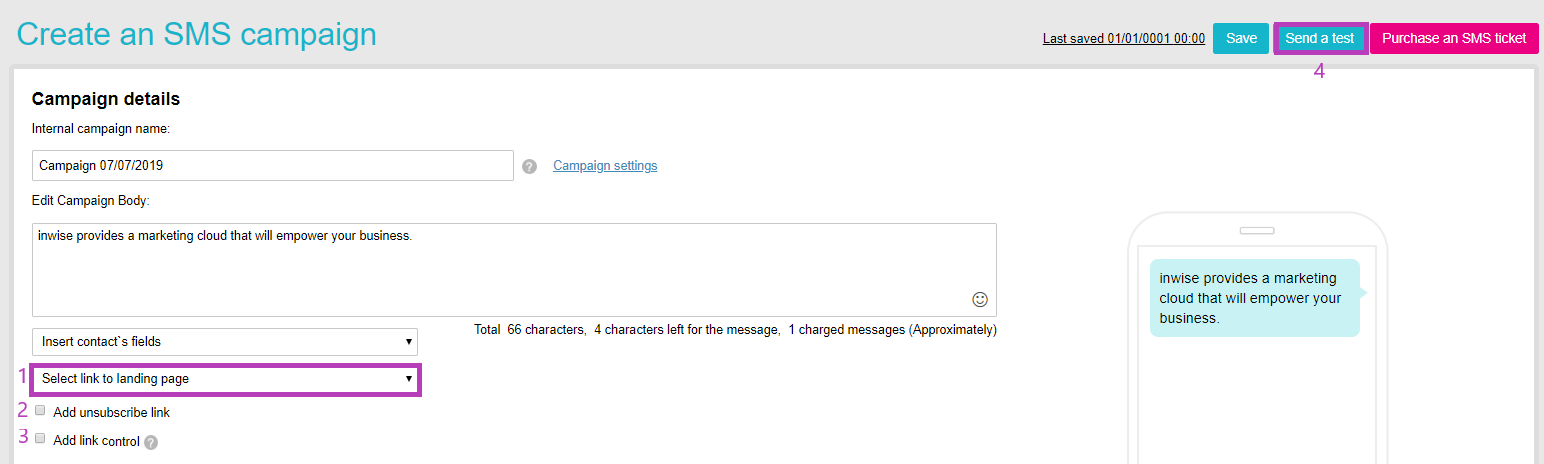
1. Select a link to the landing page – If you have created a landing page in inwise, you can link to it in the message you are sending. Open this field to choose from the landing pages in your account.
2. Add unsubscribe link – You can and should include a link for recipients to remove themselves from the mailing list (it counts as 27 characters).
3. Add link control – If you have attached a link to a message, it is recommended that you track and control link clicks so you can generate statistical data. Checking this box encodes your link and enables tracking and control (it counts as 27 characters).
At this stage, it is recommended that you send the message for review before it is sent to all recipients in order to verify its propriety (4).
Step 3 – Send a test
While you finish editing your campaign, you should send a test for yourself and a test group to review. This way, you can check the SMS propriety and visibility before sending it to your contact list. You can continue editing the message after sending the test until it is approved for final sending.
Clicking on “Send a test” saves your changes and allows you to select your test group.
After clicking “Send a test,” your campaign will be saved and a pane will open. Here, you can select and update the contact information for your test group:
Email addresses (separated by commas) – Send the current campaign to one-time contacts.
- Comma separated mobiles – Send the current message to one-time phone numbers. Enter the mobile number and click on (+).
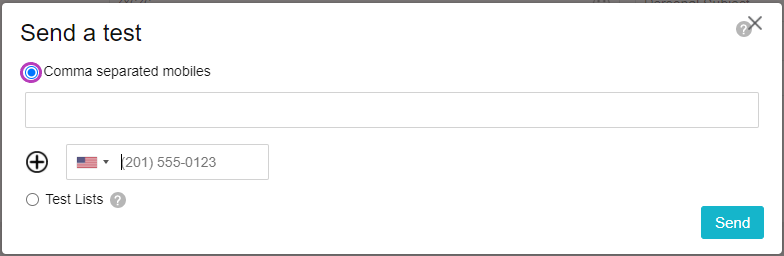
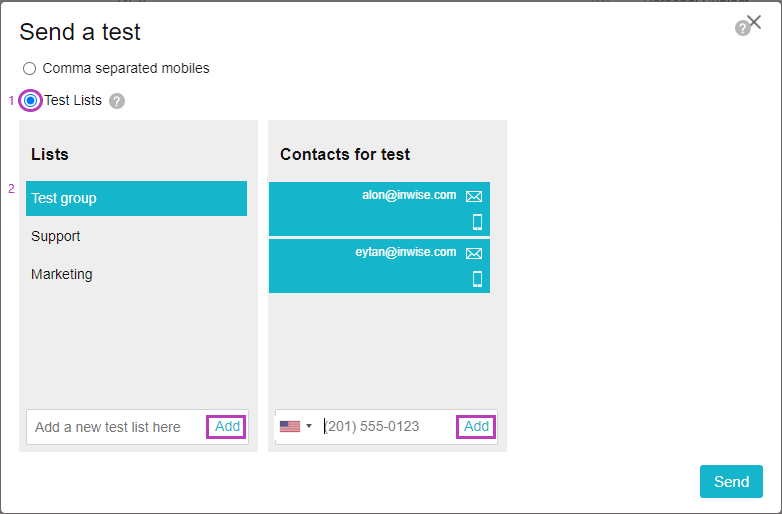
- Test lists – Defining fixed lists for sending (1):
– Lists (2): Define the group names (contacts lists) and click “Add”.
– Contacts for a test: Enter your group members’ phone number (4) and click “Add.”Click “Send”- the message will only be sent to the selected phone number within the test group.
Step 4 – Select the contacts list
Once you are finished editing, it is time to actually send the campaign.
On the Editor page, click “Next” on the bottom-right corner. You will land on the groups or segments selection page.
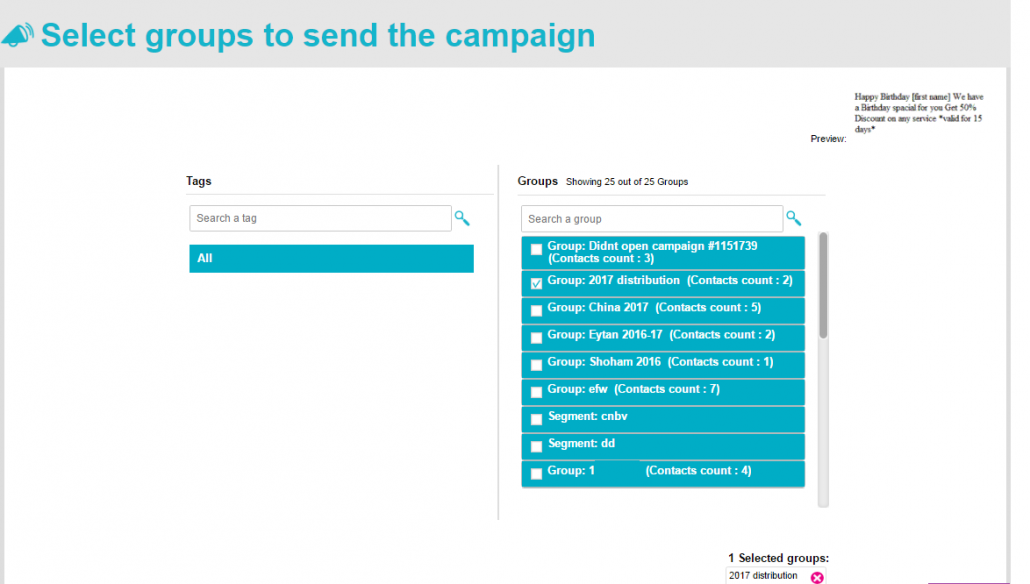
On the left side, you can search and select tags connected to your groups (optional).
On the right side, select the groups to which you want to send the campaign
Pay Attention:
- Add or remove groups by clicking on the checkbox next to their name.
- On the bottom right side of the page, you’ll see the groups you have selected. You can undo your choice by clicking the x next to their names or unchecking their box in the Groups list.
- Some contacts may appear in multiple groups, but the inwise system knows to send the campaign to those contacts only once.After selecting the appropriate groups, click “Next” at the bottom of the screen.
Step 4 – Summary & send
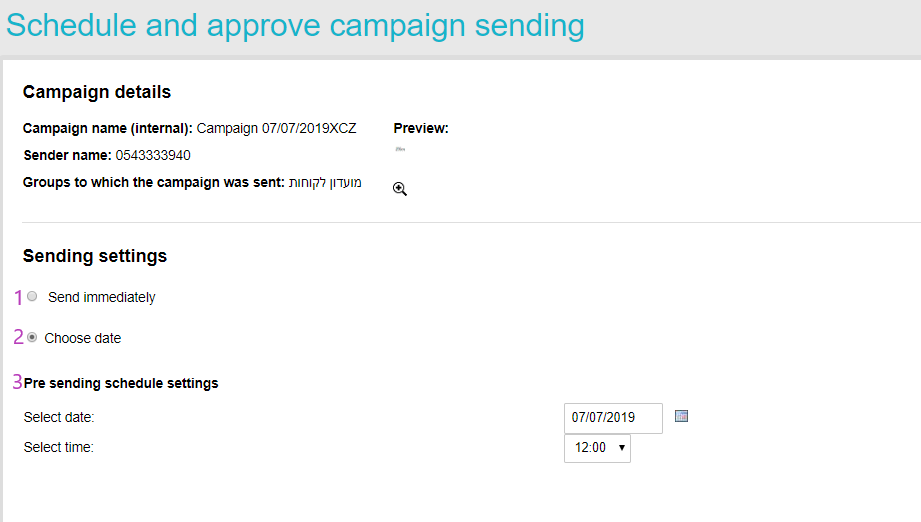
This is where you can see your campaign schedule and approve SMS to be sent.
On this page, you will see all of the campaign details, such as the campaign name, sender name, groups to which the campaign will be sent.
You can send the campaign immediately, or schedule it for later:
- If you want to send it right now, select “Send immediately.”
- If you want to schedule the email for later, click “Choose date.”
Click on the calendar icon to select the date, and then select the time.
Next, click on “Send campaign.”
You will get a message asking you to confirm that your campaign is ready to be sent.
If you want to confirm, click on “Yes” and the sending will begin right away or according to the schedule, depending on your scheduling choice.
After clicking on “Yes”, you will receive a message that the campaign was successfully sent.
That’s it! the message has been sent.
You don’t need to stay logged into the inwise system for your campaign to finish sending; this will happen automatically.
After sending, you can choose how to continue:
View Analytics, View the sending queue, or Exit to the dashboard.
To view all your campaigns, click on “Campaigns” in the main menu bar on the left. You’ll see all the campaigns you’ve built, with their status (Active, Draft, Paused), date created, and last modified date.
what is the next step? It is important to continue to tighten the connection with your recipients. This can be done through marketing automation. For example, you can specify that once a particular recipient clicks on a link describing a product in the SMS message you sent to him, it will automatically be added to the list of those interested in the product. And after two days he will receive mailings with an offer on the same product. If he purchased the product, it can be defined that after 14 days he will be sent an invitation to rate the product and so on.
How do you do that? Marketing automation